iRenata’s Guide On Adding & Configuring the Cookie Banner in Elementor (WP)
With regulations such as GDPR (General Data Protection Regulation) and CCPA (California Consumer Privacy Act) in place, website owners must ensure compliance by implementing measures such as cookie banners. These banners inform visitors about the use of cookies on a website and provide options for managing their consent. For WordPress users leveraging the power of Elementor, iRenata offers a comprehensive guide on seamlessly integrating and configuring a cookie banner.
Why a Cookie Banner? Cookies are small pieces of data stored on a user’s device by websites they visit. They serve various purposes, including remembering user preferences, analyzing site traffic, and enabling personalized experiences. However, since cookies can potentially track user behavior, regulations mandate that websites inform visitors about their use and obtain consent before setting non-essential cookies. A cookie banner serves as a transparent communication tool, ensuring compliance while maintaining user trust.
Step 1: Installing the Cookie Banner Plugin The first step in implementing a cookie banner on your Elementor-powered WordPress site is to install the Cookie Banner plugin. This plugin simplifies the process of creating and customizing a cookie banner to match your website’s design seamlessly. Navigate to the WordPress dashboard, go to Plugins > Add New, and search for “Cookie Banner.” Install and activate the plugin.
Step 2: Configuring the Cookie Banner Settings Once the plugin is activated, you can configure its settings to align with your website’s requirements. Access the plugin settings by navigating to Settings > Cookie Banner. Here, you can customize various aspects of the cookie banner, including its appearance, content, and functionality.
Appearance: Choose from a range of predefined templates or create a custom design that matches your website’s aesthetics. Adjust colors, fonts, and styling to ensure visual consistency.
Content: Craft clear and concise messages informing visitors about the use of cookies and providing options for managing their consent. You can customize the banner text to comply with relevant regulations and best practices.
Functionality: Configure how the cookie banner behaves, including its placement, animation effects, and dismissal options. Ensure that the banner is easily dismissible while still prominent enough to catch the user’s attention.
Step 3: Integrating with Elementor With the cookie banner configured to your preferences, the next step is to integrate it seamlessly into your Elementor-designed website. Fortunately, the Cookie Banner plugin offers built-in compatibility with Elementor, making the integration process straightforward.
Within the Elementor editor, add a new section or select an existing one where you want the cookie banner to appear. Drag and drop the “Shortcode” element onto the section.
Next, navigate back to the Cookie Banner settings in the WordPress dashboard. Locate the shortcode for your configured cookie banner and copy it to your clipboard.
Return to the Elementor editor and paste the shortcode into the Shortcode element you added earlier. You’ll instantly see a preview of your cookie banner within the Elementor interface.
Step 4: Testing and Optimization Before making your cookie banner live, thoroughly test its functionality across different devices and browsers to ensure a seamless user experience. Verify that the banner displays correctly, consent options work as intended, and user preferences are appropriately saved.
Additionally, periodically review and optimize your cookie banner settings to stay compliant with evolving regulations and best practices. Regularly communicate updates to your visitors to maintain transparency and trust.
The Shortcode
The shortcode is a WordPress feature that allows users to embed dynamic content or functionality within posts, pages, or widgets without needing to directly edit the underlying code. In the context of the Cookie Banner plugin, the shortcode generated by the plugin enables users to easily integrate the configured cookie banner into their WordPress website.
Once you have configured the cookie banner settings using the Cookie Banner plugin, the plugin will provide you with a shortcode. This shortcode is a snippet of text enclosed in square brackets, such as [cookie_banner]. You can copy this shortcode and paste it into any post, page, or widget where you want the cookie banner to appear.
By inserting the shortcode into your content, WordPress will automatically replace it with the configured cookie banner when the page is rendered, ensuring seamless integration without the need for manual coding or complex customization. This simplifies the process of adding and managing the cookie banner across your website, especially when using tools like Elementor to design your site’s layout.
Incorporating a cookie banner into your Elementor-built WordPress website is essential for compliance with data protection regulations and fostering user trust. With iRenata’s user-friendly plugin and comprehensive guide, you can seamlessly add and configure a cookie banner that enhances both compliance and user experience. By prioritizing transparency and user consent, you can build a more trustworthy and sustainable online presence.
Enhancing User Experience: iRenata’s Guide to Adding Cookie Banners and Popups to the Astra Theme on WordPress
Where privacy concerns are at the forefront, website owners must prioritize transparency and user consent regarding data collection practices. Implementing cookie banners and popups is not just a legal requirement but also a crucial aspect of providing a seamless and trustworthy browsing experience for visitors. For WordPress users, integrating these features seamlessly into their websites, particularly with popular themes like Astra, is paramount.
Fortunately adding cookie banners and popups to the Astra theme becomes a straightforward process. iRenata’s comprehensive guide ensures website owners can comply with regulations and effortlessly enhance user experience.
Understanding the Importance of Cookie Banners and Popups
Before delving into the technicalities, it’s crucial to grasp why cookie banners and popups are indispensable components of any website:
Compliance: Regulations such as the (UK) General Data Protection Regulation (GDPR) and the California Consumer Privacy Act (CCPA) mandate that websites must inform users about the use of cookies and obtain their consent. Failure to comply can result in hefty fines and reputational damage.
User Consent: Cookie banners and popups empower users by giving them control over their data. By providing clear information and options to accept or decline cookies, websites foster trust and respect user privacy preferences.
Enhanced User Experience: While cookie banners and popups may seem intrusive when implemented correctly, they can contribute to a positive user experience. By presenting information succinctly and unobtrusively, websites can maintain engagement and minimize disruption.
iRenata’s Guide to Adding Cookie Banners and Popups to the Astra Theme
Now, let’s explore the step-by-step process outlined by iRenata to seamlessly integrate cookie banners and popups into the Astra theme:
Choose a Plugin: iRenata recommends selecting a reliable WordPress plugin for cookie management and consent. Popular choices include CookieYes, GDPR Cookie Consent, and Cookiebot. Each plugin offers various features such as customization options, cookie scanning, and automatic compliance updates.
Install and Activate the Plugin: After selecting a suitable plugin, install and activate it on your WordPress website. Navigate to the plugin settings to configure preferences according to your website’s needs, such as cookie categories, banner design, and consent methods.
Customize Banner Appearance: Tailor the appearance of the cookie banner to align with your website’s aesthetics and branding. Most plugins offer customization options for colours, fonts, messages, and button styles. Ensure that the banner is prominent enough to capture users’ attention without obstructing content.
Configure Cookie Settings: Define which types of cookies your website uses and provide users with clear explanations of their purpose and functionality. Allow users to manage cookie preferences easily, granting them the flexibility to accept or reject specific cookie categories.
Implement Popups for Additional Consent: In addition to the cookie banner, consider implementing popups for obtaining consent for other purposes such as newsletter subscriptions or marketing communications. Customize popup designs and content to maximize engagement while respecting users’ preferences.
Test and Monitor Performance: Before making the changes live, thoroughly test the functionality of the cookie banners and popups across different devices and browsers. Regularly monitor user interactions and update cookie settings as needed to ensure ongoing compliance and optimal user experience.
Website owners can seamlessly integrate cookie banners and popups into the Astra theme, enhancing compliance with regulations and fostering trust with users. Remember, transparency and user consent are paramount in building a sustainable online presence while prioritizing privacy and user experience.
Implementing cookie banners and popups becomes an accessible task, empowering website owners to navigate the complexities of data privacy regulations while delivering exceptional user experiences on WordPress-powered websites.
What if you cannot see the standard interface of WordPress Dashboard on the Astra Theme
If you’re unable to see the standard interface of the WordPress Dashboard while using the Astra Theme, it could be due to a variety of reasons ranging from compatibility issues to conflicts with other plugins or customizations.
Here’s what you can do to troubleshoot and resolve the issue:
Check Compatibility: Ensure that the version of WordPress you’re using is compatible with the version of the Astra Theme installed on your website. Sometimes, outdated themes or plugins can cause interface issues.
Disable Plugins: Temporarily deactivate all plugins except for the Astra Theme to determine if any of them are causing conflicts. If the standard interface reappears after deactivating a specific plugin, that plugin is likely the culprit. You can then troubleshoot further or find an alternative plugin.
Switch to Default Theme: Switch to a default WordPress theme like Twenty Twenty-One to see if the issue persists. If the standard interface appears with the default theme, it indicates that there might be compatibility issues between WordPress, the Astra Theme, and any customizations you’ve made.
Check Customizations: If you’ve made customizations to the theme files or added custom code snippets, revert them to their original state one by one to identify if any of them are causing the problem.
Clear Cache: Clear your browser cache and WordPress cache (if you’re using a caching plugin) to ensure that you’re viewing the most up-to-date version of your website.
Update Software: Make sure that WordPress, the Astra Theme, and all plugins are updated to their latest versions. Developers often release updates to address bugs and improve compatibility.
Seek Support: If you’re still unable to resolve the issue, reach out to the support team of the Astra Theme or WordPress forums for assistance. They may be able to provide further guidance or troubleshoot the issue more effectively.
How to switch to the default WordPress theme
Switching to the default WordPress theme is a straightforward process that you can do from your WordPress Dashboard. Here’s how:
Login to WordPress Dashboard: Enter your website’s URL followed by /wp-admin in your web browser’s address bar. Log in with your username and password to access the WordPress Dashboard.
Navigate to Appearance > Themes: On the left-hand side menu, hover over “Appearance,” and then click on “Themes.”
Find Default Theme: In the Themes screen, you’ll see a list of all installed themes. Look for a theme with a name like “Twenty Twenty-One,” “Twenty Twenty,” or another default theme depending on the version of WordPress you are using. These default themes usually come pre-installed with WordPress.
Activate Default Theme: Hover over the default theme you want to activate, then click the “Activate” button that appears. WordPress will now switch to the default theme.
Preview (Optional): Before activating, you can click on the “Live Preview” button to see how your website looks with the default theme. This allows you to preview the changes without making them live on your site immediately.
Confirm Switch: If you’re satisfied with the preview or want to proceed without previewing, click “Activate” to switch to the default theme.
Check Your Website: Visit your website in a new browser tab or window to see how it looks with the default theme applied.
That’s it! You’ve successfully switched to the default WordPress theme. If you later decide to switch back to your previous theme or another theme, you can follow the same steps and choose the desired theme from the Themes screen.
What if the login is /customname and not the standard /wp-admin?
If the login URL for your WordPress Dashboard is different and is set to /customname instead of the standard /wp-admin, it suggests that there might be a custom configuration or modification in place.
Access the Dashboard: In your web browser’s address bar, enter your website’s URL followed by /customname . For example, if your website is example.com, you would enter example.com/customname.
Login Credentials: You should reach the login page for your WordPress Dashboard, where you’ll need to enter your username and password to proceed. Use the same login credentials you typically use to access the WordPress Dashboard.
Navigate to Appearance > Themes: After logging in, follow the same steps outlined previously: navigate to “Appearance” in the left-hand menu, then click on “Themes.”
Switch to Default Theme: Look for the default WordPress theme, such as “Twenty Twenty-One” or “Twenty Twenty,” and activate it as described earlier.
Confirm Switch: Once activated, you can preview the theme or directly activate it. Follow the same steps to check your website’s appearance with the default theme.
By following these steps, you can switch to the default WordPress theme even if your WordPress login URL is set to /customname instead of the standard /wp-admin. If you encounter any issues during this process, double-check your login credentials and ensure that you have the necessary permissions to access and modify themes within the WordPress Dashboard.
How to change the login back to the standard /wp-admin or /wp-login.php
To change the login URL back to the standard /wp-admin or /wp-login.php, you’ll need to modify your WordPress site’s settings or configurations. Here’s how you can do it:
Method 1: Using a Plugin
Install and Activate a Plugin: There are several plugins available that allow you to customize the login URL, such as “WPS Hide Login” or “Custom Login URL.” Install and activate one of these plugins from the WordPress Plugin Directory.
Access Plugin Settings: Once the plugin is activated, go to its settings page. You can usually find this under the “Settings” menu in your WordPress dashboard.
Reset Login URL: Within the plugin settings, there should be an option to reset the login URL to the default /wp-admin or /wp-login.php. Click on this option to revert the login URL back to the standard one.
Save Changes: After resetting the login URL, remember to save the changes made in the plugin settings.
Method 2: Manually Editing Files
If you’re comfortable making changes to your site’s files, you can manually edit the functions.php file in your theme’s directory. Here’s how:
Access Theme Files: Connect to your website’s server using FTP or a file manager provided by your web hosting provider. Navigate to the wp-content/themes directory and locate your currently active theme.
Edit functions.php: Download the functions.php file from your theme directory to your computer. Open it using a text editor.
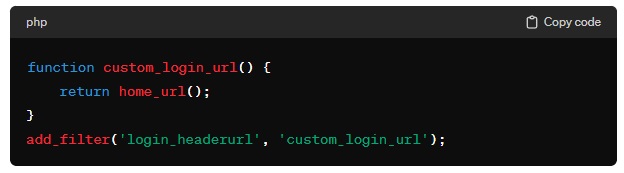
Add Code: Add the following code snippet to the end of the functions.php file: function custom_login_url() { return home_url(); } add_filter('login_headerurl', 'custom_login_url');This code will redirect the login URL to the homepage of your website.
Save and Upload: Save the changes to the functions.php file and upload it back to your server, overwriting the existing file.
This is an example of the code as cited above.
After completing either of these methods, your WordPress login URL should revert to the standard /wp-admin or /wp-login.php. You’ll then be able to access the login page using the default URL. Remember to test the login functionality to ensure everything is working as expected after making these changes.
Putting your site into maintenance mode is a common practice when you need to perform updates, make significant changes, or troubleshoot issues without disrupting the user experience. Here’s how you can put your WordPress site into maintenance mode:
Method 1: Using a Maintenance Mode Plugin
Install a Maintenance Mode Plugin: Go to your WordPress Dashboard and navigate to Plugins > Add New. Search for a maintenance mode plugin such as “WP Maintenance Mode” or “Coming Soon Page & Maintenance Mode by SeedProd.” Install and activate the plugin.
Configure the Plugin: Once activated, go to Settings > WP Maintenance Mode (or the corresponding plugin you installed). Configure the plugin settings according to your preferences. You can customize the message displayed to visitors, add a countdown timer, and choose whether to allow certain user roles to bypass maintenance mode.
Activate Maintenance Mode: After configuring the settings, toggle the maintenance mode switch to “On” or “Active.” Your site will now display the maintenance mode page to visitors while you work on it in the background.
Deactivate Maintenance Mode: Once you’ve completed your updates or changes, return to the plugin settings and turn off maintenance mode. Your site will then be accessible to visitors again.
Method 2: Using a Maintenance Page in Your Theme
If you prefer not to use a plugin, you can create a maintenance page directly in your theme’s directory:
Create a Maintenance Page: Create a new HTML file or PHP file named maintenance.php in your theme’s directory. You can use a basic HTML template or copy the contents of your theme’s 404.php file as a starting point.
Design the Maintenance Page: Customize the maintenance page to include a message informing visitors that your site is undergoing maintenance. You can also add a countdown timer or any other relevant information.
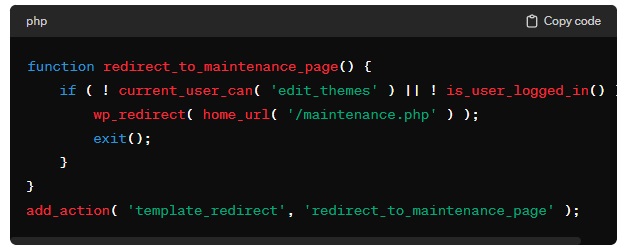
Redirect Visitors: To automatically redirect visitors to the maintenance page, add the following code to your theme’s function redirect_to_maintenance_page() { if ( ! current_user_can( 'edit_themes' ) || ! is_user_logged_in() ) { wp_redirect( home_url( '/maintenance.php' ) ); exit(); } } add_action( 'template_redirect', 'redirect_to_maintenance_page' );
Disable Maintenance Mode: Once you’ve completed your tasks, remove or comment out the code added to the functions.php file to disable maintenance mode and redirect visitors back to the regular site.
Example of the PHP code (Redirect Visitors) which has been added in text format for you to copy and paste.
Remember to test your maintenance mode setup to ensure that it functions as expected before making changes to your live site. This way, you can avoid any unexpected issues or disruptions for your visitors.
How To Access Elementor in Astra Theme
Accessing Elementor within the Astra theme is a seamless process, as both are popular tools for WordPress website development and customization. Elementor is a powerful drag-and-drop page builder plugin that allows users to create and customize their website’s layout without any coding knowledge. Here’s how you can access Elementor within the Astra theme:
Install and Activate Elementor: If you haven’t already installed the Elementor plugin, you can do so by navigating to Plugins > Add New in your WordPress Dashboard. Search for “Elementor,” then click “Install Now” and “Activate” once it’s installed.
Create or Edit a Page: To access Elementor, you’ll need to create a new page or edit an existing one. Go to Pages > Add New to create a new page, or Pages > All Pages to edit an existing one.
Launch Elementor: Once on the page editor screen, you’ll see a button labeled “Edit with Elementor.” Click on this button to launch the Elementor editor for that specific page.
Start Building: After launching Elementor, you’ll have a user-friendly interface divided into sections. On the left side, you’ll find the Elementor panel with widgets, templates, and settings. In the middle, you’ll see the canvas where you can drag and drop elements to build your page. On the right side, you’ll find the settings panel for customizing individual elements and sections.
Customize Your Page: Use the drag-and-drop functionality to add elements such as text, images, buttons, videos, and more to your page. You can customize the layout, style, and content of each element using the settings panel.
Preview and Publish: Once you’ve finished customizing your page, you can preview how it looks on different devices using the preview button. When you’re satisfied with the result, click the “Publish” button to make your changes live on your website.
Access Elementor Settings: To access Elementor’s global settings and preferences, you can go to Elementor > Settings in your WordPress Dashboard. Here, you can configure various options such as default fonts, colors, and breakpoints.
By following these steps, you can easily access Elementor within the Astra theme and leverage its powerful features to create stunning and responsive web pages for your WordPress website. Whether you’re building a simple landing page or a complex website layout, Elementor combined with the Astra theme provides you with the flexibility and versatility to bring your design ideas to life.
SEO Recommended Things Todo
LIST OF SEO THINGS TO DO & HOW TO SET UP WORDPRESS!
Create a Keyword Domain Name (use searchable words and phrases)
Set up hosting.
Select a Theme for your WordPress site – Go to Appearance – Customise in your Dashboard on the left-hand side. (I use ‘Hemmingway Theme for most of my sites).
Generate Sitemap
Upload Sitemaps to your Website/WordPress and Google Search Console
Generate Robot txt.
Upload Robot txt to your Website/WordPress back office and Google Search Console
Generate Href Tags
Upload Href Tags to your Website/WordPress back office
Create a Gmail email that matches your business brand name that you will use to manage your business on Google, use that same email for all Google Products and Services, Analytics, Google Search Console, and Google Ads. (You do not want to give your private email to web developers or the World Wide Web).
Generate Meta Tags
Generate Google Tag Manager
Upload Google Tag Manager to your website’s back office
Upload Meta Tags to your website back office (Add relevant keywords)
Add an HTML Tag to your website’s back office.
Add Google Analytics (to track your visitors)
Upload to Search Engines
Verify your website with Google Webmaster (Google Search Console)
Verify your website with Bing Webmaster
Add a cookie banner (required by law)
Add a cookie policy (required by law) (outlining your tracking)
Add terms and conditions (required by law)
Add a privacy policy (required by law)
Design a Logo & Favicon
Add favicons to desktop, tablet, and mobile phone in your Website/WordPress back office
Add your website to Google My Business (Google will rank you better for doing this)
Check Canonization
Create a Facebook Page to Match your website and connect the two together
Invite your Friends and Family on Facebook to like your page.
Create a LinkedIn Page to March your website and connect the two together
Link your social media to your social media widgets e.g., Facebook, Twitter, Instagram (Do not use a personal social media account set up a business one instead.
Add Schema Mark-up to your website back office and upload it.
Ping your site so that search engines get a signal your website is active, using pingmyurl.com
Regularly add new content to your site so that Search Engines can rank you quickly with SEO.
Create an SEO link Wheel and have more than one site blog pointing to your business
Check your website is looking good on mobile and tablet before publishing.
Make sure your website has a lot of text content using relevant keywords you would want to be targeted for.
Change the Home Page Name to the name of your domain keywords (Search engines do not like (Home or Home Page) as there are millions of websites with the same name so they do look at you favourably for using those words.
Create a Professional Email for your users and your website:
Create Email Signatures
Favourite WordPress Plugins I Recommend
Akismet Anti Spam
All- in-one-seo
Cookie Notice GDPR Consent (Web Toffee)
Debug Bar
Document Embedder
Emojis cs WP
Google Analytics (Set up Google Analytics first) MonsterInsights
GTranslate (if you want your site multilingual)
PDF Embedder (If you ever want to add PDFs to your posts)
Sassy Social Share (Go to settings to set what you want your posts and pages to do).
Subscribe to Double-Opt-In Comments
Tawk.to (For online chat widget)
Super RSS Reader (if you want to get your site to read Sports News Sites).
Visual Footer Credit Remover (Removes the name of the WordPress Theme and lets you customize the footer).
WP Forms (so that people can fill in a form and make comments).
Restore Classic Widgets (this is recommended).
WordFence (stops hackers from gaining control of your site).
Conclusion
Managing various aspects of a WordPress website, such as adding cookie banners, accessing Elementor, or changing the login URL, can seem daunting at first. However, with the right guidance and resources, these tasks become manageable for website owners and developers alike. By following the step-by-step instructions provided in this guide, users can confidently navigate through the complexities of WordPress customization within the Astra theme. Whether it’s ensuring compliance with data privacy regulations, creating visually stunning pages with Elementor, or adjusting site settings, there are solutions available.
If in doubt or encountering challenges during the process, remember that there are numerous resources available online. Forums, documentation, tutorials, and support communities can provide valuable insights and troubleshooting tips. Additionally, reaching out to experienced professionals like iRenata, known for expertise in WordPress customization, can offer personalized assistance and guidance tailored to specific needs. Ultimately, with determination, patience, and access to the wealth of resources available, anyone can effectively manage and customize their WordPress website to meet their unique requirements and achieve their desired online pres
WordPress, originally known as a simple blogging platform, has evolved into one of the most powerful and versatile content management systems (CMS) on the internet. Launched in 2003, it has become the go-to choice for individuals, businesses, and organizations looking to establish a robust online presence.
User-Friendly Interface: One of the primary reasons behind WordPress’s widespread popularity is its user-friendly interface. Even those without advanced technical skills can easily navigate and manage their websites using the intuitive dashboard. The platform offers a visual editor that allows users to create and edit content effortlessly, making it an ideal choice for beginners and seasoned developers alike.
Customization and Themes: WordPress provides a vast library of themes that allow users to customize the look and feel of their websites. Whether you’re building a blog, an e-commerce site, or a portfolio, there’s a theme for every need. The platform supports third-party themes and allows users to tweak the appearance through the theme customizer or by diving into the code for more advanced modifications.
Plugins Extend Functionality: One of the standout features of WordPress is its extensive library of plugins. These are add-ons that extend the functionality of your website without the need for complex coding. From SEO optimization to social media integration, e-commerce solutions, and security enhancements, there’s a plugin for nearly every conceivable purpose. This flexibility empowers users to create a website tailored to their specific needs.
SEO-Friendly Architecture: Search engine optimization (SEO) is crucial for any website looking to gain visibility online. WordPress is inherently SEO-friendly, with clean code and structures that search engines favor. Additionally, there are numerous SEO plugins available, such as Yoast SEO, that assist users in optimizing their content for search engines, improving their website’s chances of ranking higher in search results.
Responsive Design: With the increasing prevalence of mobile devices, having a responsive website is paramount. WordPress themes are designed to be responsive, ensuring that your site looks and functions well on various devices, including smartphones and tablets. This adaptability is not only user-friendly but also contributes to better search engine rankings, as Google prioritizes mobile-friendly websites.
Community and Support: WordPress boasts a massive and active community of users, developers, and contributors. This community support is invaluable for troubleshooting issues, seeking advice, and staying updated on the latest trends and developments. Online forums, documentation, and tutorials make it easy for users to find assistance, fostering a collaborative environment that further enhances the platform’s appeal.
Regular Updates and Security: WordPress is committed to providing a secure environment for its users. The platform regularly releases updates that not only introduce new features but also address security vulnerabilities. Users can set up automatic updates to ensure they are always running the latest version, thus minimizing the risk of security breaches.
Conclusion:
WordPress has come a long way from its humble beginnings as a blogging platform. Today, it stands as a versatile, user-friendly, and powerful content management system, empowering millions of individuals and businesses to create and manage their online presence effectively. With its customizable themes, extensive plugin library, SEO-friendly architecture, and strong community support, WordPress remains a top choice for web developers around the globe. Whether you’re a novice looking to launch a personal blog or a seasoned professional building a complex website, WordPress offers the tools and flexibility to bring your vision to life.