The Responsibilities of a Website Designer and Distinguishing It from Marketing and Advertising
A well-designed website is pivotal for the success of any business or personal endeavor. A website designer plays a crucial role in crafting the virtual presence of a brand, ensuring it is visually appealing, functional, and user-friendly. However, it is essential to differentiate between website design and other related disciplines like marketing and advertising, as each has distinct responsibilities and objectives.
Core Responsibilities of a Website Designer
Visual Design and Aesthetics: The primary responsibility of a website designer is to create an aesthetically pleasing design. This involves choosing the right color schemes, typography, and imagery to convey the brand’s message effectively. The design should be visually engaging to capture and retain visitors’ attention.
User Experience (UX) Design: A website must be easy to navigate and intuitive for users. Website designers focus on creating a seamless user experience by organizing content logically, designing clear navigation paths, and ensuring that important information is easily accessible. This includes designing interactive elements like buttons, forms, and menus that enhance the user experience.
Responsive Design: With the proliferation of devices used to access the internet, website designers must ensure that their designs are responsive. This means the website should function well and look good on various screen sizes and resolutions, from desktops to smartphones and tablets.
Brand Consistency: A website is an extension of a brand, so it must reflect the brand’s identity consistently. Website designers work to incorporate brand elements such as logos, brand colors, and fonts to maintain a cohesive look and feel that aligns with the overall brand strategy.
Technical Skills: Although not primarily developers, website designers often need a working knowledge of coding languages like HTML, CSS, and JavaScript. This technical expertise enables them to implement their designs accurately or communicate effectively with web developers.
Performance Optimization: A well-designed website should also be optimized for performance. This includes ensuring fast load times, optimizing images and other media, and implementing efficient coding practices. Poor performance can deter users and negatively impact search engine rankings.
Accessibility: Ensuring that a website is accessible to all users, including those with disabilities, is a critical responsibility of a website designer. This involves adhering to web accessibility standards and guidelines, such as providing alternative text for images and ensuring that the site is navigable via keyboard for those who cannot use a mouse. However, access for front-end editing for the client is at the website’s discretion and is not mandatory.
Distinguishing Website Design from Marketing and Advertising
While website design, marketing, and advertising are interrelated and often overlap, they are distinct disciplines with different goals and responsibilities.
Website Design: As outlined, website design focuses on the visual and functional aspects of a website. The primary objective is to create an engaging, user-friendly online presence that effectively communicates the brand’s identity and provides a positive user experience.
Marketing: Marketing encompasses a broader scope of activities aimed at promoting a product or service. This includes market research, content creation, social media management, email marketing, and search engine optimization (SEO). While a well-designed website is a crucial component of a marketing strategy, marketing itself involves a variety of channels and tactics to reach and engage the target audience.
Advertising is a subset of marketing that focuses specifically on paid promotional activities. This includes digital ads, such as pay-per-click (PPC) campaigns, display ads, social media ads, and traditional advertising methods like print, television, and radio ads. The goal of advertising is to drive traffic and generate leads or sales through targeted promotional messages.
Avoiding Confusion Between Website Design, Marketing, and Advertising
To avoid confusion between these disciplines, it is important to recognize their unique contributions and how they complement each other.
Clear Objectives: Define clear objectives for each discipline. Website design aims to create a functional and visually appealing site, marketing focuses on broader promotional activities, and advertising targets specific campaigns to drive immediate results.
Collaborative Approach: Encourage collaboration between website designers, marketers, and advertisers. This ensures that the website design supports marketing strategies and that advertising efforts are aligned with the website’s capabilities and design.
Distinct Roles: Understand and respect the distinct roles and expertise of each discipline. While there may be overlap, recognizing the specialized skills required for website design, marketing, and advertising will help ensure each area is given the attention it deserves.
Conclusion
A website designer plays a critical role in creating the online face of a brand, focusing on visual design, user experience, and technical functionality. While closely related to marketing and advertising, website design is a distinct discipline with unique responsibilities. By understanding and respecting the differences between these areas, businesses can create cohesive and effective online strategies that drive engagement and success.
Once the website is ranked and optimized, it is up to the business owner to generate leads and convert visitors into customers. This responsibility does not fall under the website designer’s purview unless a prearranged agreement exists for the designer to handle marketing and advertising efforts. The designer’s primary role is to ensure that the site is visually appealing, functional, and optimized for search engines, providing a strong foundation for the business.
However, lead generation, engaging potential clients, and driving sales through various marketing and advertising strategies are tasks that the business owner must undertake or delegate to a dedicated marketing team.
Stonewalling: Understanding Its Impact on Mental Health
Stonewalling, a term often used in the context of relationships and communication, refers to the act of refusing to engage, respond, or acknowledge another person’s attempts to communicate. This behavior can take various forms, such as giving silent treatment, avoiding eye contact, physically withdrawing from the conversation, or dismissing the concerns of others. While it might be a temporary coping mechanism for some, persistent stonewalling can have significant detrimental effects on mental health for both the person stonewalling and the one being stonewalled.
As a sufferer of mental health issues, it is imperative that companies recognize the severe impact their stonewalling behavior can have on an individual’s well-being. When a company’s consistent refusal to engage or provide clear communication exacerbates or causes mental health deterioration, they should be held accountable and provide appropriate compensation. This could include covering the costs of mental health treatment, providing paid leave for recovery, and implementing measures to prevent such situations in the future. Such compensation acknowledges the harm caused and helps the individual manage the resulting mental health challenges, ensuring they are not left to bear the burden alone. Holding companies accountable in this way can also serve as a deterrent, encouraging more transparent and supportive communication practices in the workplace.
The Mechanics of Stonewalling
Stonewalling typically arises in situations of conflict or high stress. It may stem from an individual’s need to protect themselves from perceived threats, overwhelming emotions, or a lack of effective communication skills. However, when this behavior becomes habitual, it leads to a breakdown in communication, fostering a toxic environment.
In relationships, stonewalling can be a defense mechanism against criticism or a way to avoid confrontation. In the workplace, it might manifest as a refusal to collaborate or communicate openly with colleagues. Regardless of the context, the implications are far-reaching.
Impact on the Stonewalled
Emotional Distress: Being stonewalled can lead to feelings of rejection, insignificance, and frustration. The emotional disconnect can make individuals feel isolated and unsupported, potentially leading to depression and anxiety.
Erosion of Self-Esteem: Persistent stonewalling can make the recipient doubt their self-worth and question their abilities to communicate effectively or maintain relationships.
Increased Stress: The uncertainty and ambiguity resulting from stonewalling can cause chronic stress. The recipient may constantly worry about the state of the relationship or their position at work, leading to long-term stress-related health issues.
Strained Relationships: In personal relationships, stonewalling can erode trust and intimacy, leading to a breakdown in the relationship. In professional settings, it can hinder teamwork and productivity, affecting overall job performance and satisfaction.
Impact on the Stonewaller
Emotional Suppression: Stonewallers often suppress their emotions instead of addressing them, which can lead to unresolved emotional issues and internalized stress. Over time, this can manifest as physical health problems such as high blood pressure and heart disease.
Impaired Relationships: Habitual stonewalling damages relationships, often leading to isolation. The inability to communicate effectively can result in a lack of deep, meaningful connections with others.
Increased Anxiety and Stress: Avoiding confrontation does not eliminate the underlying issues causing stress. Instead, it can compound anxiety, as the unresolved issues remain a constant source of worry.
Negative Behavioral Patterns: Stonewalling can become a learned behavior, perpetuating a cycle of poor communication. This can make it difficult for the stonewaller to develop healthier communication strategies, further entrenching the behavior.
Addressing Stonewalling
Self-Awareness: Recognizing the tendency to stonewall is the first step towards change. Individuals must acknowledge their behavior and understand its impact on their mental health and relationships.
Developing Communication Skills: Learning effective communication techniques, such as active listening and expressing emotions constructively, can help break the cycle of stonewalling. Therapy or counseling can be beneficial in developing these skills.
Creating a Safe Environment: Encouraging an open and non-judgmental atmosphere in relationships can reduce the likelihood of stonewalling. Both parties need to feel safe expressing their thoughts and emotions without fear of criticism or rejection.
Seeking Professional Help: If stonewalling is deeply ingrained or causing significant distress, seeking the help of a mental health professional can be crucial. Therapists can work with individuals or couples to address underlying issues and develop healthier communication patterns.
Conclusion
Stonewalling is a destructive behavior that can have profound effects on mental health and relationships. Understanding its impact is essential for both those who engage in it and those who are subjected to it. By fostering open communication, developing emotional intelligence, and seeking professional support when needed, individuals can overcome the negative effects of stonewalling and build healthier, more fulfilling relationships.
When a company stonewalls, it is crucial to take proactive steps to address the issue. Start by documenting all instances of stonewalling, including dates, times, and the nature of the unresponsive behavior. This record will be valuable if you need to escalate the situation. Attempt to communicate through multiple channels, such as email, phone calls, and in-person meetings, to ensure your efforts are visible and documented. If these attempts fail, seek support from higher management or the human resources department to mediate and resolve the issue. Engaging a third-party mediator or legal advisor might be necessary if the stonewalling persists and impacts your professional responsibilities or mental well-being. Throughout this process, maintain a professional demeanor and focus on constructive dialogue to find a resolution.
The Importance of Verifying Social Media Accounts: Enhancing Trust and Credibility
Introduction: Social media has become an integral part of our lives, both personally and professionally, with billions of users worldwide, platforms like Facebook, Instagram, Twitter, and others serve as essential tools for communication, networking, and brand promotion. However, amidst the vast sea of profiles and content, establishing trust and credibility can be challenging. This is where the verification of social media accounts plays a crucial role.
What is Verification?
Verification is the process through which social media platforms authenticate the identity of users, typically by attaching a verified badge or checkmark to their profiles. This badge serves as a mark of authenticity, indicating that the account is genuine and associated with a legitimate individual, brand, or organization.
Benefits of Verifying Social Media Accounts:
Enhanced Credibility: Verified accounts instill trust and credibility among followers and potential customers. Users are more likely to engage with content from verified accounts, knowing that they are interacting with legitimate sources.
Prevention of Impersonation: Verification helps prevent impersonation and identity theft on social media platforms. By verifying accounts, platforms can distinguish genuine profiles from fake or unauthorized ones, reducing the risk of scams and fraudulent activities.
Establishing Authority: For individuals, brands, and businesses, a verified badge signifies authority and influence within their respective fields. It establishes them as reputable figures or entities, which can attract a larger audience and enhance their online reputation.
Improved Visibility and Reach: Verified accounts often receive preferential treatment from social media algorithms, resulting in higher visibility and reach. This can lead to increased exposure for content and greater engagement with followers.
Protection Against Misinformation: Verified accounts are better equipped to combat misinformation and fake news. Their verified status lends credibility to the information they share, helping to distinguish factual content from unreliable sources.
Verification of Official Accounts: Social media platforms verify accounts of public figures, celebrities, brands, and organizations to distinguish them from fan accounts or unofficial pages. This ensures that users can easily find and connect with the official representatives of their favorite personalities or brands.
Streamlined Communication: Verification simplifies communication between users and verified accounts. It provides a clear indicator of authenticity, making it easier for users to identify and engage with trusted sources.
Building Consumer Trust: For businesses and brands, verification builds consumer trust and confidence in their products or services. It signals to potential customers that they are dealing with a reputable and established entity, encouraging them to engage and transact with greater confidence.
The verification of social media accounts offers numerous benefits, ranging from enhanced credibility and authority to improved visibility and protection against impersonation. Whether you’re an individual, brand, or organization, obtaining a verified badge on social media can significantly bolster your online presence and reputation. By prioritizing verification, users and businesses can build trust, credibility, and authenticity in the digital landscape, ultimately fostering positive relationships with their audience and stakeholders.
How to Verify Your Account on Facebook
Verifying your account on Facebook can add an extra layer of security and credibility to your profile. Here’s a step-by-step guide on how to do it:
Log in to Your Account: Visit Facebook’s website or open the Facebook app on your mobile device and log in using your credentials.
Access Settings: Once logged in, navigate to your profile by clicking on your name or profile picture. Then, locate the dropdown arrow at the top right corner of the page. Click on it to reveal a menu. From the menu, select “Settings & Privacy” and then choose “Settings”.
Navigate to Verification Settings: In the Settings menu, look for the “General” tab on the left-hand side. Click on it. Within the General settings, you’ll find the option “Personal Information”. Click on it, and you should see the “Identity Confirmation” section.
Start Verification Process: Click on the “Confirm Your Identity” option. Facebook may prompt you to re-enter your password for security reasons.
Choose Verification Method: Facebook offers different methods to verify your identity. The available options may include providing a government-issued ID, such as a driver’s license or passport, entering a mobile phone number, or connecting to your official business website.
Provide Necessary Information: Depending on the method you choose, you will need to provide the required information. For example, if you choose to verify with a government-issued ID, you’ll need to upload a scanned image or photo of your ID. Ensure that the information matches the details on your Facebook account.
Submit for Review: After providing the necessary information, review it carefully to ensure accuracy. Once you’re satisfied, submit the verification request to Facebook for review.
Wait for Confirmation: Facebook will review your submission, which may take some time. You will receive a notification once your account has been verified or if any additional steps are required.
Confirmation: If your verification is successful, you will receive a confirmation notification from Facebook. Your profile will display a verification badge, usually in the form of a blue checkmark, indicating that your account is verified.
Maintain Accuracy: It’s essential to keep your profile information accurate and up-to-date to maintain your account’s verification status. If any changes occur, such as a name change or updated ID, make sure to update your Facebook account accordingly.
Remember, not all accounts are eligible for verification, and Facebook reserves the right to verify accounts based on its own criteria, which often prioritize accounts of public figures, celebrities, brands, and businesses. If your account isn’t eligible for verification, focus on keeping your account secure by enabling two-factor authentication and following Facebook’s community standards and policies.
How to Verify Your Account on Instagram
Verifying your Instagram account can help establish authenticity and credibility, especially for public figures, celebrities, brands, and businesses. Here’s a step-by-step guide on how to verify your Instagram account:
Open the Instagram App: Launch the Instagram app on your mobile device. Ensure you are logged into the account you wish to verify.
Access Your Profile: Tap on the profile icon located at the bottom right corner of the screen. This will take you to your Instagram profile.
Access Settings: On your profile page, locate the three horizontal lines or the gear icon (for iOS devices) at the top right corner of the screen. Tap on it to access the settings menu.
Navigate to Account Settings: Scroll down the settings menu and find the “Account” option. Tap on it to proceed.
Access Request Verification: Within the Account settings, look for the “Request Verification” option. It’s usually located towards the bottom of the list. Tap on it to initiate the verification process.
Provide Necessary Information: Instagram will prompt you to fill out a verification form. This form typically requires you to provide your account username, full name, and a form of identification. Depending on your account type (individual or business), you may need to provide different types of identification.
Upload Supporting Documents: Instagram typically requires you to upload a government-issued photo ID, such as a driver’s license, passport, or national identification card. Ensure that the information on the ID matches the details you provided in the verification form.
Submit Verification Request: Once you’ve filled out the verification form and uploaded the necessary documents, review all the information carefully to ensure accuracy. Then, tap on the “Submit” or “Send” button to submit your verification request to Instagram.
Wait for Review: Instagram will review your verification request, which may take some time. Be patient and keep an eye on your notifications for any updates regarding the status of your request.
Confirmation: If your verification request is successful, you will receive a notification from Instagram confirming that your account has been verified. Your profile will display a blue checkmark badge next to your username, indicating that it’s a verified account.
Maintain Authenticity: Once your account is verified, it’s important to continue following Instagram’s community guidelines and terms of service to maintain your verified status. Avoid engaging in activities that could jeopardize your account’s credibility.
Remember, Instagram reserves the right to verify accounts based on its own criteria, and not all accounts are eligible for verification. If your verification request is denied, you can reapply after 30 days. Focus on building a strong presence on Instagram through high-quality content, engagement with your audience, and adherence to community guidelines.
Verifying Twitter (X) Account
Access Your Account Settings: Log in to your Twitter account using your username and password. Once logged in, click on your profile picture at the top right corner of the screen to open a dropdown menu. From the dropdown menu, select “Settings and privacy.”
Navigate to Verification: In the Settings and Privacy menu, find the “Account” section on the left sidebar. Under “Account,” look for the option labeled “Verification request” or “Verification.” Click on it to start the verification process.
Review Eligibility Requirements: Before proceeding with the verification request, review Twitter’s eligibility criteria. Generally, Twitter verifies accounts of public figures, brands, organizations, and individuals in key interest categories. Ensure that your account meets Twitter’s verification requirements to increase your chances of approval.
Complete the Verification Form: Twitter will prompt you to complete a verification form. This form typically requires you to provide: Your account username. A profile picture that represents you or your brand. A header photo that reflects your brand or identity. A bio that accurately describes you or your brand. A website link that provides additional information about you or your brand. Additional information or links to news articles, press releases, or other materials that establish your identity or credibility. Fill out the form accurately and provide all the necessary information requested by Twitter.
Upload Supporting Documents: Twitter may require you to upload supporting documents to verify your identity or affiliation with a brand or organization. These documents may include a government-issued ID (e.g., driver’s license, passport). Articles of incorporation or business license (for brands or organizations). Official documents that demonstrate your public figure status (e.g., press releases, news articles). Upload the required documents securely and ensure that they meet Twitter’s verification guidelines.
Submit Verification Request: Once you’ve completed the verification form and uploaded the necessary documents, review all the information carefully. Double-check that everything is accurate and up-to-date. Click on the “Submit” or “Send” button to submit your verification request to Twitter.
Wait for Review: After submitting your verification request, Twitter will review your application. Verification review times can vary, so be patient and monitor your email and Twitter notifications for updates on the status of your request.
Confirmation: If your verification request is successful, Twitter will notify you via email and in-app notification. Your profile will display a blue checkmark badge next to your username, indicating that it’s a verified account. Congratulations! Your account is now verified on Twitter.
Maintain Verified Status: Once your account is verified, continue to adhere to Twitter’s rules and guidelines. Avoid engaging in activities that could jeopardize your account’s credibility or violate Twitter’s terms of service. Regularly update your profile information and engage with your audience to maintain an active and authentic presence on Twitter.
By following these steps, you can successfully verify your account on Twitter and establish authenticity and credibility in the Twitterverse.
Guide to Verifying Your TikTok Account
Open the TikTok App: Launch the TikTok app on your mobile device. Ensure you are logged into the account you wish to verify.
Access Your Profile: Tap on the “Me” icon located at the bottom right corner of the screen. This will take you to your TikTok profile.
Access Settings: On your profile page, locate the three horizontal dots or the settings gear icon, usually found at the top right corner of the screen. Tap on it to access the settings menu.
Navigate to Privacy and Settings: In the settings menu, look for the “Privacy and Settings” option. Tap on it to proceed.
Access Account Settings: Within the Privacy and Settings menu, find the “Manage Account” section. Tap on it to access your account settings.
Request Verification: In the Account settings, look for the “Request Verification” option. This option may be labeled differently, such as “Verify account” or “Verification badge.” Tap on the verification option to start the verification process.
Complete Verification Form: TikTok will prompt you to complete a verification form. This form typically requires you to provide: Your account username. A profile picture that represents you or your brand. A bio that accurately describes you or your brand. Links to your other social media profiles (optional). Fill out the form accurately and provide all the necessary information requested by TikTok.
Upload Supporting Documents: TikTok may require you to upload supporting documents to verify your identity or affiliation with a brand or organization. These documents may include a government-issued ID (e.g., driver’s license, passport). Documents that demonstrate your public figure status or affiliation with a brand or organization. Upload the required documents securely and ensure that they meet TikTok’s verification guidelines.
Submit Verification Request: Once you’ve completed the verification form and uploaded the necessary documents, review all the information carefully. Double-check that everything is accurate and up-to-date. Tap on the “Submit” or “Send” button to submit your verification request to TikTok.
Wait for Review: After submitting your verification request, TikTok will review your application. Verification review times can vary, so be patient and monitor your notifications for updates on the status of your request.
Confirmation: If your verification request is successful, TikTok will notify you via email and in-app notification. Your profile will display a verification badge, usually in the form of a blue checkmark, indicating that it’s a verified account. Congratulations! Your account is now verified on TikTok.
Maintain Verified Status: Once your account is verified, continue to adhere to TikTok’s community guidelines and policies. Engage with your audience regularly and create high-quality content to maintain an active and authentic presence on TikTok.
By following these steps, you can successfully verify your account on TikTok and establish authenticity and credibility on the platform.
Guide to Verifying Your Pinterest Account
Access Your Account Settings: Log in to your Pinterest account using your username and password. Once logged in, click on your profile picture at the top right corner of the screen to open a dropdown menu. From the dropdown menu, select “Settings” to access your account settings.
Navigate to Account Settings: In the Settings menu, look for the “Account settings” section. This may be labeled differently depending on the version of Pinterest you’re using. Click on the “Account settings” option to proceed.
Access Claim Website: Within the Account settings, find the “Claim” or “Claim website” option. This is where you can verify your website or blog with Pinterest. Click on the “Claim” option to start the verification process.
Choose Verification Method: Pinterest offers multiple verification methods, including adding an HTML tag to your website, uploading an HTML file to your website’s server, or verifying through a meta tag. Choose the verification method that works best for you and your website.
Follow Verification Instructions: Depending on the verification method you selected, Pinterest will provide you with specific instructions to complete the verification process. For example, if you choose to verify by adding an HTML tag, Pinterest will provide you with a snippet of code to add to the header section of your website’s HTML code.
Verify Your Website: Follow the instructions provided by Pinterest to verify your website. This may involve adding the provided HTML code to your website or uploading the HTML file to your website’s server. Once you’ve completed the verification steps, click on the “Verify” or “Finish” button within Pinterest to confirm.
Wait for Verification: After completing the verification steps, Pinterest will attempt to verify your website. Verification may take some time, so be patient and check back later to see if your website has been successfully verified.
Confirmation: If your website verification is successful, Pinterest will notify you via email and in-app notification. Your profile will display a checkmark badge next to your website URL, indicating that it’s a verified website.
Additional Verification Options: In addition to website verification, Pinterest also offers verification for profiles representing public figures, celebrities, brands, and businesses. To request profile verification, contact Pinterest support and provide them with relevant information and documentation to verify your identity or affiliation with the entity you represent.
Maintain Verified Status: Once your website or profile is verified on Pinterest, continue to adhere to Pinterest’s community guidelines and policies. Regularly update your website or profile with high-quality content and engage with your audience to maintain an active and authentic presence on Pinterest.
By following these steps, you can successfully verify your account or website on Pinterest and establish authenticity and credibility on the platform.
Guide to Verifying Your LinkedIn Account
Access Your LinkedIn Profile: Log in to your LinkedIn account using your username and password. Once logged in, navigate to your profile by clicking on your profile picture or the “Me” icon at the top right corner of the screen.
Access Privacy & Settings: Click on the “Me” dropdown menu and select “Settings & Privacy” from the options.
Navigate to Privacy: In the “Settings & Privacy” menu, click on the “Privacy” tab located on the left-hand side.
4. Access Visibility: Scroll down to the “How others see your profile and network information” section. Click on “Edit your public profile” to access your profile visibility settings.
Customize Your Public Profile URL: In the public profile settings, customize your public profile URL to make it more professional and easier to find. Click on “Edit your custom URL” and enter a personalized URL that includes your name or brand.
Enable Public Profile Features: Scroll down to the “Profile visibility off LinkedIn” section. Make sure the toggle switch for “Your profile’s public visibility” is turned on to allow your profile to be visible to non-LinkedIn members.
Verify Email Address: Verify the email address associated with your LinkedIn account if you haven’t already done so. LinkedIn may require you to verify your email address to ensure the security of your account.
Add Phone Number: Optionally, you can add and verify your phone number for added security and to enhance your account’s credibility.
9. Provide Additional Information: LinkedIn may prompt you to provide additional information to verify your identity or professional credentials. Fill out any required fields accurately to strengthen your profile’s authenticity.
Request Verification Badge: Contact LinkedIn support to request a verification badge for your account. Provide any necessary documentation or proof of identity or affiliation with a company or organization.
Wait for Review: Once you’ve submitted your verification request, LinkedIn will review your application. Verification review times can vary, so be patient and monitor your email for updates on the status of your request.
Confirmation: If your verification request is successful, LinkedIn will notify you via email and in-app notification. Your profile will display a verification badge, typically in the form of a blue checkmark, next to your name, indicating that it’s a verified account.
Maintain Verified Status: After your account is verified, continue to adhere to LinkedIn’s community guidelines and policies. Regularly update your profile with relevant information, connect with professionals in your industry, and engage with your network to maintain an active and credible presence on LinkedIn.
By following these steps, you can successfully verify your account on LinkedIn and establish authenticity and credibility in the professional networking community.
iRenata’s Guide On Adding & Configuring the Cookie Banner in Elementor (WP)
With regulations such as GDPR (General Data Protection Regulation) and CCPA (California Consumer Privacy Act) in place, website owners must ensure compliance by implementing measures such as cookie banners. These banners inform visitors about the use of cookies on a website and provide options for managing their consent. For WordPress users leveraging the power of Elementor, iRenata offers a comprehensive guide on seamlessly integrating and configuring a cookie banner.
Why a Cookie Banner? Cookies are small pieces of data stored on a user’s device by websites they visit. They serve various purposes, including remembering user preferences, analyzing site traffic, and enabling personalized experiences. However, since cookies can potentially track user behavior, regulations mandate that websites inform visitors about their use and obtain consent before setting non-essential cookies. A cookie banner serves as a transparent communication tool, ensuring compliance while maintaining user trust.
Step 1: Installing the Cookie Banner Plugin The first step in implementing a cookie banner on your Elementor-powered WordPress site is to install the Cookie Banner plugin. This plugin simplifies the process of creating and customizing a cookie banner to match your website’s design seamlessly. Navigate to the WordPress dashboard, go to Plugins > Add New, and search for “Cookie Banner.” Install and activate the plugin.
Step 2: Configuring the Cookie Banner Settings Once the plugin is activated, you can configure its settings to align with your website’s requirements. Access the plugin settings by navigating to Settings > Cookie Banner. Here, you can customize various aspects of the cookie banner, including its appearance, content, and functionality.
Appearance: Choose from a range of predefined templates or create a custom design that matches your website’s aesthetics. Adjust colors, fonts, and styling to ensure visual consistency.
Content: Craft clear and concise messages informing visitors about the use of cookies and providing options for managing their consent. You can customize the banner text to comply with relevant regulations and best practices.
Functionality: Configure how the cookie banner behaves, including its placement, animation effects, and dismissal options. Ensure that the banner is easily dismissible while still prominent enough to catch the user’s attention.
Step 3: Integrating with Elementor With the cookie banner configured to your preferences, the next step is to integrate it seamlessly into your Elementor-designed website. Fortunately, the Cookie Banner plugin offers built-in compatibility with Elementor, making the integration process straightforward.
Within the Elementor editor, add a new section or select an existing one where you want the cookie banner to appear. Drag and drop the “Shortcode” element onto the section.
Next, navigate back to the Cookie Banner settings in the WordPress dashboard. Locate the shortcode for your configured cookie banner and copy it to your clipboard.
Return to the Elementor editor and paste the shortcode into the Shortcode element you added earlier. You’ll instantly see a preview of your cookie banner within the Elementor interface.
Step 4: Testing and Optimization Before making your cookie banner live, thoroughly test its functionality across different devices and browsers to ensure a seamless user experience. Verify that the banner displays correctly, consent options work as intended, and user preferences are appropriately saved.
Additionally, periodically review and optimize your cookie banner settings to stay compliant with evolving regulations and best practices. Regularly communicate updates to your visitors to maintain transparency and trust.
The Shortcode
The shortcode is a WordPress feature that allows users to embed dynamic content or functionality within posts, pages, or widgets without needing to directly edit the underlying code. In the context of the Cookie Banner plugin, the shortcode generated by the plugin enables users to easily integrate the configured cookie banner into their WordPress website.
Once you have configured the cookie banner settings using the Cookie Banner plugin, the plugin will provide you with a shortcode. This shortcode is a snippet of text enclosed in square brackets, such as [cookie_banner]. You can copy this shortcode and paste it into any post, page, or widget where you want the cookie banner to appear.
By inserting the shortcode into your content, WordPress will automatically replace it with the configured cookie banner when the page is rendered, ensuring seamless integration without the need for manual coding or complex customization. This simplifies the process of adding and managing the cookie banner across your website, especially when using tools like Elementor to design your site’s layout.
Incorporating a cookie banner into your Elementor-built WordPress website is essential for compliance with data protection regulations and fostering user trust. With iRenata’s user-friendly plugin and comprehensive guide, you can seamlessly add and configure a cookie banner that enhances both compliance and user experience. By prioritizing transparency and user consent, you can build a more trustworthy and sustainable online presence.
Enhancing User Experience: iRenata’s Guide to Adding Cookie Banners and Popups to the Astra Theme on WordPress
Where privacy concerns are at the forefront, website owners must prioritize transparency and user consent regarding data collection practices. Implementing cookie banners and popups is not just a legal requirement but also a crucial aspect of providing a seamless and trustworthy browsing experience for visitors. For WordPress users, integrating these features seamlessly into their websites, particularly with popular themes like Astra, is paramount.
Fortunately adding cookie banners and popups to the Astra theme becomes a straightforward process. iRenata’s comprehensive guide ensures website owners can comply with regulations and effortlessly enhance user experience.
Understanding the Importance of Cookie Banners and Popups
Before delving into the technicalities, it’s crucial to grasp why cookie banners and popups are indispensable components of any website:
Compliance: Regulations such as the (UK) General Data Protection Regulation (GDPR) and the California Consumer Privacy Act (CCPA) mandate that websites must inform users about the use of cookies and obtain their consent. Failure to comply can result in hefty fines and reputational damage.
User Consent: Cookie banners and popups empower users by giving them control over their data. By providing clear information and options to accept or decline cookies, websites foster trust and respect user privacy preferences.
Enhanced User Experience: While cookie banners and popups may seem intrusive when implemented correctly, they can contribute to a positive user experience. By presenting information succinctly and unobtrusively, websites can maintain engagement and minimize disruption.
iRenata’s Guide to Adding Cookie Banners and Popups to the Astra Theme
Now, let’s explore the step-by-step process outlined by iRenata to seamlessly integrate cookie banners and popups into the Astra theme:
Choose a Plugin: iRenata recommends selecting a reliable WordPress plugin for cookie management and consent. Popular choices include CookieYes, GDPR Cookie Consent, and Cookiebot. Each plugin offers various features such as customization options, cookie scanning, and automatic compliance updates.
Install and Activate the Plugin: After selecting a suitable plugin, install and activate it on your WordPress website. Navigate to the plugin settings to configure preferences according to your website’s needs, such as cookie categories, banner design, and consent methods.
Customize Banner Appearance: Tailor the appearance of the cookie banner to align with your website’s aesthetics and branding. Most plugins offer customization options for colours, fonts, messages, and button styles. Ensure that the banner is prominent enough to capture users’ attention without obstructing content.
Configure Cookie Settings: Define which types of cookies your website uses and provide users with clear explanations of their purpose and functionality. Allow users to manage cookie preferences easily, granting them the flexibility to accept or reject specific cookie categories.
Implement Popups for Additional Consent: In addition to the cookie banner, consider implementing popups for obtaining consent for other purposes such as newsletter subscriptions or marketing communications. Customize popup designs and content to maximize engagement while respecting users’ preferences.
Test and Monitor Performance: Before making the changes live, thoroughly test the functionality of the cookie banners and popups across different devices and browsers. Regularly monitor user interactions and update cookie settings as needed to ensure ongoing compliance and optimal user experience.
Website owners can seamlessly integrate cookie banners and popups into the Astra theme, enhancing compliance with regulations and fostering trust with users. Remember, transparency and user consent are paramount in building a sustainable online presence while prioritizing privacy and user experience.
Implementing cookie banners and popups becomes an accessible task, empowering website owners to navigate the complexities of data privacy regulations while delivering exceptional user experiences on WordPress-powered websites.
What if you cannot see the standard interface of WordPress Dashboard on the Astra Theme
If you’re unable to see the standard interface of the WordPress Dashboard while using the Astra Theme, it could be due to a variety of reasons ranging from compatibility issues to conflicts with other plugins or customizations.
Here’s what you can do to troubleshoot and resolve the issue:
Check Compatibility: Ensure that the version of WordPress you’re using is compatible with the version of the Astra Theme installed on your website. Sometimes, outdated themes or plugins can cause interface issues.
Disable Plugins: Temporarily deactivate all plugins except for the Astra Theme to determine if any of them are causing conflicts. If the standard interface reappears after deactivating a specific plugin, that plugin is likely the culprit. You can then troubleshoot further or find an alternative plugin.
Switch to Default Theme: Switch to a default WordPress theme like Twenty Twenty-One to see if the issue persists. If the standard interface appears with the default theme, it indicates that there might be compatibility issues between WordPress, the Astra Theme, and any customizations you’ve made.
Check Customizations: If you’ve made customizations to the theme files or added custom code snippets, revert them to their original state one by one to identify if any of them are causing the problem.
Clear Cache: Clear your browser cache and WordPress cache (if you’re using a caching plugin) to ensure that you’re viewing the most up-to-date version of your website.
Update Software: Make sure that WordPress, the Astra Theme, and all plugins are updated to their latest versions. Developers often release updates to address bugs and improve compatibility.
Seek Support: If you’re still unable to resolve the issue, reach out to the support team of the Astra Theme or WordPress forums for assistance. They may be able to provide further guidance or troubleshoot the issue more effectively.
How to switch to the default WordPress theme
Switching to the default WordPress theme is a straightforward process that you can do from your WordPress Dashboard. Here’s how:
Login to WordPress Dashboard: Enter your website’s URL followed by /wp-admin in your web browser’s address bar. Log in with your username and password to access the WordPress Dashboard.
Navigate to Appearance > Themes: On the left-hand side menu, hover over “Appearance,” and then click on “Themes.”
Find Default Theme: In the Themes screen, you’ll see a list of all installed themes. Look for a theme with a name like “Twenty Twenty-One,” “Twenty Twenty,” or another default theme depending on the version of WordPress you are using. These default themes usually come pre-installed with WordPress.
Activate Default Theme: Hover over the default theme you want to activate, then click the “Activate” button that appears. WordPress will now switch to the default theme.
Preview (Optional): Before activating, you can click on the “Live Preview” button to see how your website looks with the default theme. This allows you to preview the changes without making them live on your site immediately.
Confirm Switch: If you’re satisfied with the preview or want to proceed without previewing, click “Activate” to switch to the default theme.
Check Your Website: Visit your website in a new browser tab or window to see how it looks with the default theme applied.
That’s it! You’ve successfully switched to the default WordPress theme. If you later decide to switch back to your previous theme or another theme, you can follow the same steps and choose the desired theme from the Themes screen.
What if the login is /customname and not the standard /wp-admin?
If the login URL for your WordPress Dashboard is different and is set to /customname instead of the standard /wp-admin, it suggests that there might be a custom configuration or modification in place.
Access the Dashboard: In your web browser’s address bar, enter your website’s URL followed by /customname . For example, if your website is example.com, you would enter example.com/customname.
Login Credentials: You should reach the login page for your WordPress Dashboard, where you’ll need to enter your username and password to proceed. Use the same login credentials you typically use to access the WordPress Dashboard.
Navigate to Appearance > Themes: After logging in, follow the same steps outlined previously: navigate to “Appearance” in the left-hand menu, then click on “Themes.”
Switch to Default Theme: Look for the default WordPress theme, such as “Twenty Twenty-One” or “Twenty Twenty,” and activate it as described earlier.
Confirm Switch: Once activated, you can preview the theme or directly activate it. Follow the same steps to check your website’s appearance with the default theme.
By following these steps, you can switch to the default WordPress theme even if your WordPress login URL is set to /customname instead of the standard /wp-admin. If you encounter any issues during this process, double-check your login credentials and ensure that you have the necessary permissions to access and modify themes within the WordPress Dashboard.
How to change the login back to the standard /wp-admin or /wp-login.php
To change the login URL back to the standard /wp-admin or /wp-login.php, you’ll need to modify your WordPress site’s settings or configurations. Here’s how you can do it:
Method 1: Using a Plugin
Install and Activate a Plugin: There are several plugins available that allow you to customize the login URL, such as “WPS Hide Login” or “Custom Login URL.” Install and activate one of these plugins from the WordPress Plugin Directory.
Access Plugin Settings: Once the plugin is activated, go to its settings page. You can usually find this under the “Settings” menu in your WordPress dashboard.
Reset Login URL: Within the plugin settings, there should be an option to reset the login URL to the default /wp-admin or /wp-login.php. Click on this option to revert the login URL back to the standard one.
Save Changes: After resetting the login URL, remember to save the changes made in the plugin settings.
Method 2: Manually Editing Files
If you’re comfortable making changes to your site’s files, you can manually edit the functions.php file in your theme’s directory. Here’s how:
Access Theme Files: Connect to your website’s server using FTP or a file manager provided by your web hosting provider. Navigate to the wp-content/themes directory and locate your currently active theme.
Edit functions.php: Download the functions.php file from your theme directory to your computer. Open it using a text editor.
Add Code: Add the following code snippet to the end of the functions.php file: function custom_login_url() { return home_url(); } add_filter('login_headerurl', 'custom_login_url');This code will redirect the login URL to the homepage of your website.
Save and Upload: Save the changes to the functions.php file and upload it back to your server, overwriting the existing file.
This is an example of the code as cited above.
After completing either of these methods, your WordPress login URL should revert to the standard /wp-admin or /wp-login.php. You’ll then be able to access the login page using the default URL. Remember to test the login functionality to ensure everything is working as expected after making these changes.
Putting your site into maintenance mode is a common practice when you need to perform updates, make significant changes, or troubleshoot issues without disrupting the user experience. Here’s how you can put your WordPress site into maintenance mode:
Method 1: Using a Maintenance Mode Plugin
Install a Maintenance Mode Plugin: Go to your WordPress Dashboard and navigate to Plugins > Add New. Search for a maintenance mode plugin such as “WP Maintenance Mode” or “Coming Soon Page & Maintenance Mode by SeedProd.” Install and activate the plugin.
Configure the Plugin: Once activated, go to Settings > WP Maintenance Mode (or the corresponding plugin you installed). Configure the plugin settings according to your preferences. You can customize the message displayed to visitors, add a countdown timer, and choose whether to allow certain user roles to bypass maintenance mode.
Activate Maintenance Mode: After configuring the settings, toggle the maintenance mode switch to “On” or “Active.” Your site will now display the maintenance mode page to visitors while you work on it in the background.
Deactivate Maintenance Mode: Once you’ve completed your updates or changes, return to the plugin settings and turn off maintenance mode. Your site will then be accessible to visitors again.
Method 2: Using a Maintenance Page in Your Theme
If you prefer not to use a plugin, you can create a maintenance page directly in your theme’s directory:
Create a Maintenance Page: Create a new HTML file or PHP file named maintenance.php in your theme’s directory. You can use a basic HTML template or copy the contents of your theme’s 404.php file as a starting point.
Design the Maintenance Page: Customize the maintenance page to include a message informing visitors that your site is undergoing maintenance. You can also add a countdown timer or any other relevant information.
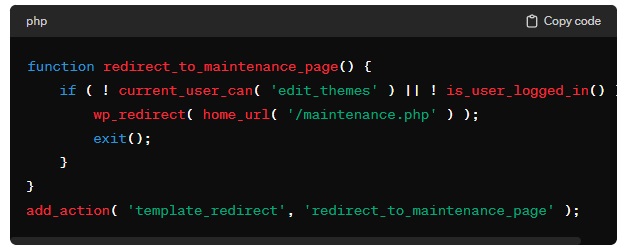
Redirect Visitors: To automatically redirect visitors to the maintenance page, add the following code to your theme’s function redirect_to_maintenance_page() { if ( ! current_user_can( 'edit_themes' ) || ! is_user_logged_in() ) { wp_redirect( home_url( '/maintenance.php' ) ); exit(); } } add_action( 'template_redirect', 'redirect_to_maintenance_page' );
Disable Maintenance Mode: Once you’ve completed your tasks, remove or comment out the code added to the functions.php file to disable maintenance mode and redirect visitors back to the regular site.
Example of the PHP code (Redirect Visitors) which has been added in text format for you to copy and paste.
Remember to test your maintenance mode setup to ensure that it functions as expected before making changes to your live site. This way, you can avoid any unexpected issues or disruptions for your visitors.
How To Access Elementor in Astra Theme
Accessing Elementor within the Astra theme is a seamless process, as both are popular tools for WordPress website development and customization. Elementor is a powerful drag-and-drop page builder plugin that allows users to create and customize their website’s layout without any coding knowledge. Here’s how you can access Elementor within the Astra theme:
Install and Activate Elementor: If you haven’t already installed the Elementor plugin, you can do so by navigating to Plugins > Add New in your WordPress Dashboard. Search for “Elementor,” then click “Install Now” and “Activate” once it’s installed.
Create or Edit a Page: To access Elementor, you’ll need to create a new page or edit an existing one. Go to Pages > Add New to create a new page, or Pages > All Pages to edit an existing one.
Launch Elementor: Once on the page editor screen, you’ll see a button labeled “Edit with Elementor.” Click on this button to launch the Elementor editor for that specific page.
Start Building: After launching Elementor, you’ll have a user-friendly interface divided into sections. On the left side, you’ll find the Elementor panel with widgets, templates, and settings. In the middle, you’ll see the canvas where you can drag and drop elements to build your page. On the right side, you’ll find the settings panel for customizing individual elements and sections.
Customize Your Page: Use the drag-and-drop functionality to add elements such as text, images, buttons, videos, and more to your page. You can customize the layout, style, and content of each element using the settings panel.
Preview and Publish: Once you’ve finished customizing your page, you can preview how it looks on different devices using the preview button. When you’re satisfied with the result, click the “Publish” button to make your changes live on your website.
Access Elementor Settings: To access Elementor’s global settings and preferences, you can go to Elementor > Settings in your WordPress Dashboard. Here, you can configure various options such as default fonts, colors, and breakpoints.
By following these steps, you can easily access Elementor within the Astra theme and leverage its powerful features to create stunning and responsive web pages for your WordPress website. Whether you’re building a simple landing page or a complex website layout, Elementor combined with the Astra theme provides you with the flexibility and versatility to bring your design ideas to life.
SEO Recommended Things Todo
LIST OF SEO THINGS TO DO & HOW TO SET UP WORDPRESS!
Create a Keyword Domain Name (use searchable words and phrases)
Set up hosting.
Select a Theme for your WordPress site – Go to Appearance – Customise in your Dashboard on the left-hand side. (I use ‘Hemmingway Theme for most of my sites).
Generate Sitemap
Upload Sitemaps to your Website/WordPress and Google Search Console
Generate Robot txt.
Upload Robot txt to your Website/WordPress back office and Google Search Console
Generate Href Tags
Upload Href Tags to your Website/WordPress back office
Create a Gmail email that matches your business brand name that you will use to manage your business on Google, use that same email for all Google Products and Services, Analytics, Google Search Console, and Google Ads. (You do not want to give your private email to web developers or the World Wide Web).
Generate Meta Tags
Generate Google Tag Manager
Upload Google Tag Manager to your website’s back office
Upload Meta Tags to your website back office (Add relevant keywords)
Add an HTML Tag to your website’s back office.
Add Google Analytics (to track your visitors)
Upload to Search Engines
Verify your website with Google Webmaster (Google Search Console)
Verify your website with Bing Webmaster
Add a cookie banner (required by law)
Add a cookie policy (required by law) (outlining your tracking)
Add terms and conditions (required by law)
Add a privacy policy (required by law)
Design a Logo & Favicon
Add favicons to desktop, tablet, and mobile phone in your Website/WordPress back office
Add your website to Google My Business (Google will rank you better for doing this)
Check Canonization
Create a Facebook Page to Match your website and connect the two together
Invite your Friends and Family on Facebook to like your page.
Create a LinkedIn Page to March your website and connect the two together
Link your social media to your social media widgets e.g., Facebook, Twitter, Instagram (Do not use a personal social media account set up a business one instead.
Add Schema Mark-up to your website back office and upload it.
Ping your site so that search engines get a signal your website is active, using pingmyurl.com
Regularly add new content to your site so that Search Engines can rank you quickly with SEO.
Create an SEO link Wheel and have more than one site blog pointing to your business
Check your website is looking good on mobile and tablet before publishing.
Make sure your website has a lot of text content using relevant keywords you would want to be targeted for.
Change the Home Page Name to the name of your domain keywords (Search engines do not like (Home or Home Page) as there are millions of websites with the same name so they do look at you favourably for using those words.
Create a Professional Email for your users and your website:
Create Email Signatures
Favourite WordPress Plugins I Recommend
Akismet Anti Spam
All- in-one-seo
Cookie Notice GDPR Consent (Web Toffee)
Debug Bar
Document Embedder
Emojis cs WP
Google Analytics (Set up Google Analytics first) MonsterInsights
GTranslate (if you want your site multilingual)
PDF Embedder (If you ever want to add PDFs to your posts)
Sassy Social Share (Go to settings to set what you want your posts and pages to do).
Subscribe to Double-Opt-In Comments
Tawk.to (For online chat widget)
Super RSS Reader (if you want to get your site to read Sports News Sites).
Visual Footer Credit Remover (Removes the name of the WordPress Theme and lets you customize the footer).
WP Forms (so that people can fill in a form and make comments).
Restore Classic Widgets (this is recommended).
WordFence (stops hackers from gaining control of your site).
Conclusion
Managing various aspects of a WordPress website, such as adding cookie banners, accessing Elementor, or changing the login URL, can seem daunting at first. However, with the right guidance and resources, these tasks become manageable for website owners and developers alike. By following the step-by-step instructions provided in this guide, users can confidently navigate through the complexities of WordPress customization within the Astra theme. Whether it’s ensuring compliance with data privacy regulations, creating visually stunning pages with Elementor, or adjusting site settings, there are solutions available.
If in doubt or encountering challenges during the process, remember that there are numerous resources available online. Forums, documentation, tutorials, and support communities can provide valuable insights and troubleshooting tips. Additionally, reaching out to experienced professionals like iRenata, known for expertise in WordPress customization, can offer personalized assistance and guidance tailored to specific needs. Ultimately, with determination, patience, and access to the wealth of resources available, anyone can effectively manage and customize their WordPress website to meet their unique requirements and achieve their desired online pres
Mastering Money Management: A Guide to Financial Success
Money management is a crucial skill that empowers individuals to achieve their financial goals, build wealth, and secure a stable future. Whether you’re just starting your career or planning for retirement, effective money management is the key to financial well-being.
Budgeting: Creating and sticking to a budget is the foundation of sound money management. A budget helps you track your income, expenses, and savings, providing a clear picture of your financial situation. Start by listing your sources of income and categorizing your expenses, including fixed costs like rent and utilities, variable expenses like groceries and entertainment, and savings goals. Use budgeting tools or apps to streamline the process and monitor your spending habits.
Emergency Fund: Building an emergency fund is a crucial aspect of money management. Life is unpredictable, and unexpected expenses can arise at any time. Aim to save three to six months’ worth of living expenses in an easily accessible account. This fund serves as a financial safety net, providing peace of mind during challenging times without derailing your long-term financial goals.
Debt Management: Effectively managing debt is essential for maintaining a healthy financial portfolio. Prioritize high-interest debts, such as credit cards, and work towards paying them off as quickly as possible. Consider debt consolidation options or negotiating lower interest rates to make repayment more manageable. Developing a strategy to tackle debt systematically can significantly improve your financial standing.
Investing Wisely: Investing is a powerful tool for wealth creation over time. Whether through retirement accounts, stocks, bonds, or real estate, investing allows your money to grow and work for you. Diversify your investments to spread risk and take a long-term perspective. If you’re unsure where to start, consult with a financial advisor to create an investment strategy aligned with your goals and risk tolerance.
Retirement Planning: It’s never too early to start planning for retirement. Contribute regularly to retirement accounts like 401(k)s or IRAs to take advantage of compound interest. Understand your employer’s retirement benefits and consider additional savings strategies, such as individual retirement accounts (IRAs) or other investment vehicles. The earlier you start, the more time your investments have to grow.
Smart Spending: Practice mindful spending by distinguishing between needs and wants. Prioritize essential expenses while curbing unnecessary purchases. Look for ways to save on everyday expenses, such as cooking at home, using public transportation, or taking advantage of discounts. Small adjustments in spending habits can lead to significant savings over time.
Conclusion:
The stark reality for low-income people and the vulnerable who live payday to payday is they do not have savings and if there are more bills than incoming money what are they supposed to do? It is all very well talking about budgeting and money management but if an individual can see to the last penny what is coming in and what is going out no amount of budgeting or money management advice is going to help.
The policymakers have never experienced poverty for themselves and rely on the penpushers in office to tell them even though the penpushers are biased and will tell them anything to keep their high-end jobs whilst the rest of the world suffers.
These people can scream at me all they like but I can show them evidence of people in poverty and how they worry night after night how they are going to pay the next bill or where are they going to get the money from to put food on the table.
Money management is a skill that anyone can develop with dedication and discipline. (But even if you have budgeted only your bare necessities and there are more bills than money coming in, no amount of advice is going to help).
For the people who have enough money coming in budgeting, saving, investing, and planning for the future, you can achieve financial stability and build wealth over time. Take control of your financial destiny, make informed decisions, and pave the way for a secure and prosperous future. Remember, mastering money management is a lifelong journey, and every small step you take today contributes to a brighter financial tomorrow.
The Escalating Cost of Living Crisis: Navigating Economic Challenges
As individuals and families grapple with rising expenses across various sectors, the ability to maintain a comfortable standard of living becomes increasingly challenging. Here I delve into the factors contributing to the cost of living crisis, its ramifications on different demographics, and potential strategies for individuals and policymakers to navigate these economic challenges.
Factors Driving the Cost of Living Crisis:
Inflation: One of the primary culprits behind the cost of living crisis is inflation. As prices for goods and services rise, the purchasing power of consumers diminishes. Inflation can be influenced by factors such as increased demand, supply chain disruptions, and changes in monetary policy.
Housing Costs: Skyrocketing housing prices and rent have become a significant burden for many individuals and families. Urbanization, limited housing supply, and speculative investment in real estate contribute to this issue, making it difficult for people to find affordable and stable housing.
Stagnant Wages: In some regions, wage growth has failed to keep pace with the increasing cost of living. This wage stagnation exacerbates the challenges faced by workers, as their income struggles to cover basic needs and expenses.
Rising Healthcare Expenses: The cost of healthcare has surged in numerous countries, placing an additional financial strain on households. This includes not only the rising cost of health insurance but also out-of-pocket expenses for medical treatments, medications, and preventive care.
Education Costs: As the demand for higher education continues to rise, so do tuition fees and related expenses. Student loan debt has reached staggering levels, impacting the financial stability of recent graduates and young professionals.
Ramifications on Different Demographics:
Middle-Class Squeeze: The cost of living crisis disproportionately affects the middle class, as they often face the dual challenge of rising expenses and limited access to social safety nets. Maintaining a comfortable lifestyle becomes elusive for many middle-income earners.
Vulnerable Populations: Low-income households and vulnerable populations are particularly susceptible to the cost of living crisis. The struggle to afford necessities such as housing, food, and healthcare deepens existing economic inequalities.
Youth and Students: The younger generation, burdened by student loan debt and facing an uncertain job market, grapples with the challenge of establishing financial independence. High living costs in urban areas also make it challenging for young professionals to thrive.
Strategies to Navigate the Crisis:
Government Intervention: Policymakers can implement measures to mitigate the cost of living crisis, such as targeted subsidies for essential services, housing affordability initiatives, and progressive taxation to ensure a fair distribution of wealth.
Investment in Affordable Housing: Governments and private entities can collaborate to increase the supply of affordable housing, addressing the root cause of the housing crisis. This includes incentivizing the construction of affordable units and implementing rent control measures.
Wage Reforms: Advocating for fair wages and supporting policies that promote income equality are crucial steps in addressing the wage stagnation aspect of the crisis. This includes adjusting the minimum wage to align with the rising cost of living.
Healthcare and Education Reforms: Governments can explore strategies to make healthcare and education more accessible and affordable. This may involve reevaluating healthcare policies, subsidizing education, and addressing the root causes of rising costs in these sectors.
Conclusion:
The cost of living crisis is a multifaceted challenge that requires comprehensive and coordinated efforts from individuals, communities, and policymakers. By addressing the root causes of rising expenses and implementing targeted interventions, societies can strive to create a more equitable and sustainable economic environment. Stakeholders must work together to navigate these challenges and ensure a better quality of life for all.
Remember if you are experiencing financial difficulty, do not brush the problem under the carpet in the hope it will go away. If you ignore the letters and emails you will only make matters worse. Write out a financial monthly expenditure plan and offer something rather than nothing even if it is £5.00 They cannot take you to court if you have made an offer. Keep all evidence of communication.
Embracing Frugality: The Art of Living on a Shoestring Budget
As the cost of living crisis continues to rise, many individuals find themselves grappling with the challenge of making ends meet on a shoestring budget. Living frugally doesn’t mean sacrificing the quality of life; instead, it requires a shift in mindset and a commitment to making thoughtful choices.
Budgeting Mastery:
The cornerstone of successful shoestring living is mastering the art of budgeting. Creating a detailed budget helps identify essential expenses and discretionary spending. By tracking income and expenses meticulously, individuals can gain a clearer understanding of their financial situation and identify areas where they can cut back without compromising on necessities.
Smart Shopping:
Living on a tight budget requires a strategic approach to shopping. Embrace thrift stores, discount outlets, and online platforms that offer affordable alternatives. Generic brands often provide comparable quality at a fraction of the cost. Additionally, consider buying in bulk when possible, as it often results in significant savings over time.
Meal Planning and Cooking at Home:
Eating out frequently can quickly drain a budget. Embracing meal planning and cooking at home not only saves money but also promotes healthier eating habits. Purchasing ingredients in bulk, preparing meals in advance, and exploring affordable recipes can significantly reduce monthly food expenses.
DIY and Repurposing:
The do-it-yourself (DIY) approach is a powerful tool for those on a shoestring budget. From home repairs to crafting personalized gifts, embracing a hands-on mentality can lead to substantial savings. Repurposing old items or finding creative alternatives can also breathe new life into belongings that might otherwise be discarded.
Embracing Minimalism:
Living on a shoestring often involves decluttering both physical and mental space. Adopting a minimalist lifestyle encourages individuals to focus on what truly brings them joy and fulfillment, rather than accumulating material possessions. Selling or donating unused items not only provides extra income but also helps declutter living spaces.
Prioritizing Debt Repayment:
For those dealing with debt, prioritizing repayment is crucial. Allocating a portion of income towards debt reduction not only helps eliminate financial burdens but also improves credit scores, providing more financial flexibility in the future.
Utilizing Community Resources:
Communities often have resources available to assist those in need. Food banks, community centers, and local programs can provide support during challenging times. Embracing community resources fosters a sense of connection and collaboration, reminding individuals that they are not alone in their financial journey.
Conclusion:
Living on a shoestring requires resilience, creativity, and a willingness to embrace a simpler, more intentional lifestyle. By mastering budgeting, adopting smart shopping habits, and prioritizing needs over wants, individuals can navigate financial constraints without sacrificing their well-being. The art of living on a shoestring is not about deprivation; it’s about making conscious choices that lead to a more fulfilling and sustainable life.
Not everyone is born with silver spoons in their mouths or has high paid jobs and the majority struggle to bring food to the table and keep a roof over their heads. It is so easy for people to dictate from their thrones when they have never experienced poverty for themselves and steal prosperity from every one of us.
I have found from constantly researching and learning how to deal with obstacles that come my way and my book which I plan to launch soon will show you how to get around the system that is trying to run you into the ground, quite literally.
I have a voice and I am not afraid to use it. I am not afraid of anyone or anything and I will fight for my rights and yours and will stand up to any entity.
Unlocking Your Potential: A Journey into Personal Development
Personal development is a lifelong journey of self-discovery, growth, and improvement. It is a commitment to becoming the best version of yourself and living a fulfilling and purposeful life. In a rapidly changing world, the importance of personal development cannot be overstated, as it empowers individuals to navigate challenges, embrace opportunities, and cultivate resilience.
Understanding Personal Development:
Personal development encompasses a broad spectrum of activities and practices aimed at enhancing one’s self-awareness, skills, and potential. It involves continuous learning, self-reflection, and a willingness to step out of one’s comfort zone. The journey towards personal development is unique to each individual, as it revolves around identifying strengths, weaknesses, values, and goals.
Key Principles of Personal Development:
Self-Awareness: Developing a deep understanding of oneself is the foundation of personal development. This involves recognizing strengths, weaknesses, beliefs, and values. Through self-awareness, individuals gain clarity about their goals and aspirations, paving the way for intentional growth.
Goal Setting: Setting clear and achievable goals is crucial for personal development. Goals provide direction and motivation, helping individuals stay focused on their journey. Whether short-term or long-term, well-defined goals serve as milestones that mark progress and success.
Continuous Learning: Embracing a mindset of continuous learning is integral to personal development. This can involve formal education, self-directed study, or experiential learning. Staying curious and open-minded fosters adaptability and resilience in the face of life’s challenges.
Embracing Challenges: Challenges are growth opportunities. Personal development involves confronting and overcoming obstacles, which builds resilience and strength. Embracing challenges also encourages individuals to step outside their comfort zones, fostering personal and professional growth.
Strategies for Personal Development:
Create a Personal Development Plan: Outline specific goals and the steps required to achieve them. A well-thought-out plan serves as a roadmap for personal growth, providing clarity and direction.
Prioritize Self-Care: Taking care of physical, mental, and emotional well-being is essential for personal development. Establishing healthy habits, such as regular exercise, proper nutrition, and adequate sleep, contributes to overall resilience.
Build a Support System: Surround yourself with positive influences and a supportive network. Seek guidance from mentors, friends, or professionals who can provide valuable insights and encouragement during your personal development journey.
Practice Mindfulness: Cultivate mindfulness through practices such as meditation or mindfulness exercises. Being present in the moment enhances self-awareness and reduces stress, contributing to overall well-being.
The Transformative Impact of Personal Development:
Improved Confidence and Self-Esteem: As individuals progress on their personal development journey, they gain a deeper understanding of their abilities and strengths. This self-awareness fosters increased confidence and a positive self-image.
Enhanced Resilience: Personal development equips individuals with the tools to navigate life’s challenges with resilience and adaptability. The ability to bounce back from setbacks is a hallmark of a well-developed individual.
Better Relationships: Improved self-awareness and effective communication skills foster healthier relationships. Personal development encourages empathy, understanding, and the ability to connect with others on a deeper level.
Career Advancement: Investing in personal development often leads to enhanced professional skills and increased career satisfaction. Continuous learning and self-improvement can open doors to new opportunities and career advancement.
Conclusion:
Embarking on a journey of personal development is a transformative and empowering endeavor. By prioritizing self-awareness, setting meaningful goals, and embracing continuous learning, individuals can unlock their full potential and lead more fulfilling lives. The benefits extend beyond personal growth, positively impacting relationships, careers, and overall well-being. As we navigate the complexities of life, the commitment to personal development becomes a guiding force, propelling us toward a more purposeful and rewarding existence.
Being an advocate for mental health, I know from personal experience the struggles people go through, especially with the cost of living crisis. I have experienced unimaginable trauma in my life, but I am still standing. I have learned not to allow anyone or any entity to bully you, you have rights, and do not be afraid to use them.
If you have something that is on your mind and you would like to share, just leave a comment or if there is something more private, just drop me a message and I will give you advice using the form below:
Capturing Moments, Crafting Memories: The Art and Essence of Photography
Photography stands as a timeless art form that has the power to freeze time and immortalize the beauty of the world around us. Beyond being a simple documentation of reality, photography is a means of storytelling, self-expression, and a visual journey that transcends words.
The Evolution of Photography:
The journey of photography began in the early 19th century with the invention of the camera obscura and the first permanent photograph captured by Joseph Nicéphore Niépce. Over the years, photography has undergone a remarkable evolution, progressing from black and white film to the advent of color photography and, more recently, the digital era. Today, smartphones equipped with high-quality cameras have democratized photography, turning everyone into potential visual storytellers.
The Art of Seeing:
At its core, photography is more than just pointing and shooting; it is about perceiving the world through a unique lens. The art of seeing involves recognizing the beauty in ordinary moments, understanding light, composition, and perspective. Photographers are visual poets, translating emotions, stories, and atmospheres into captivating images that resonate with viewers on a profound level.
Genres of Photography:
Portrait Photography: Capturing the essence of individuals, portrait photography focuses on conveying personality, emotions, and stories through the lens. Whether candid or posed, portraits freeze moments in time, creating visual narratives of human experiences.
Landscape Photography: Celebrating the grandeur of nature, landscape photography showcases the beauty of the world’s diverse environments. From sweeping vistas to intimate details, photographers immortalize the awe-inspiring scenes that Mother Nature provides.
Street Photography: Rooted in spontaneity and candid moments, street photography is a dynamic genre that documents life in urban environments. It often captures the raw, unscripted beauty of everyday life, revealing the soul of a city and its inhabitants.
Macro Photography: Exploring the intricate details of small subjects, macro photography allows us to witness the beauty hidden in the miniature world. From delicate flowers to tiny insects, this genre unveils a new perspective on the often-overlooked aspects of life.
Technology’s Impact:
The advent of digital photography and sophisticated camera technology has revolutionized the way we approach image-making. Post-processing tools, like Adobe Lightroom and Photoshop, enable photographers to fine-tune their craft, enhancing colors, tones, and compositions. Additionally, the rise of social media platforms has provided a global stage for photographers to share their work, fostering a vibrant and interconnected community.
Photography as a Form of Expression:
Beyond its technical aspects, photography is a powerful medium for self-expression. Photographers use their work to convey emotions, tell stories, and communicate perspectives. Each photograph is a unique voice in a collective visual dialogue, contributing to the rich tapestry of human expression.
Preserving Memories:
Photography serves as a means to preserve memories and create a visual legacy. From family gatherings to momentous life events, photographs become tangible reminders of the passage of time. In an era where everything moves at a rapid pace, photography allows us to revisit cherished moments and share our stories with future generations.
Different Types Of Photography
Portrait Photography:
Focuses on capturing the personality, expressions, and mood of individuals or groups.
Landscape Photography:
Involves capturing wide vistas, nature scenes, and outdoor environments.
Macro Photography:
Zooms in to capture extreme close-ups of small subjects, highlighting intricate details.
Street Photography:
Captures everyday life and scenes in public places, often candid and unposed.
Fashion Photography:
Highlights clothing, accessories, and style in a visually appealing manner.
Architectural Photography:
Involves capturing buildings, structures, and architectural details with an emphasis on design and aesthetics.
Wildlife Photography:
Focuses on capturing animals in their natural habitats, often requiring patience and specialized equipment.
Sports Photography:
Captures fast-paced action in various sports, emphasizing moments of intensity and athleticism.
Documentary Photography:
Tells a story or conveys a message by capturing real-life events, often in a journalistic style.
Food Photography:
Showcases food in an enticing and visually appealing way, often used in advertisements or culinary publications.
Astrophotography:
Involves capturing celestial objects, stars, and other astronomical phenomena.
Travel Photography:
Captures the essence of different locations, cultures, and landscapes from around the world.
Underwater Photography:
Involves capturing images beneath the water’s surface, showcasing marine life and underwater landscapes.
Fine Art Photography:
Expresses the photographer’s artistic vision, often blurring the line between photography and other visual arts.
Product Photography:
Showcases products in a visually appealing way for commercial purposes, emphasizing details and features.
Archaeological Photography:
Captures artifacts, archaeological sites, and historical objects for research and documentation.
Night Photography:
Involves capturing scenes in low-light conditions, often highlighting cityscapes, stars, or long-exposure effects.
Pet Photography:
Focuses on capturing the personality and charm of pets, commonly done for personal or commercial purposes.
Medical Photography:
Used for documentation and educational purposes in the medical field, capturing medical conditions, surgeries, or research subjects.
Industrial Photography:
Captures scenes and elements related to industries, manufacturing processes, and technology.
Conclusion:
Photography is a dynamic and ever-evolving art form that transcends cultural and linguistic boundaries. Whether you are a professional photographer or someone capturing moments with a smartphone, the essence of photography lies in the ability to tell stories, evoke emotions, and immortalize the beauty of the world. As we continue to embrace new technologies and explore innovative techniques, the art of photography remains a timeless and indispensable part of the human experience. So, pick up your camera, venture into the world, and let your unique perspective unfold through the lens, one click at a time.
In my heyday, I used to do Wedding, Portraiture & Commercial Photography before transitioning to digital marketing and website design. I still would like to go back to taking photographs (health permitting). I even had a book published called “Cardiff Bay Waterfront 2009”.