Brown and Cream Landscape Image Of A Typewriter With Wording Typed On Paper “How To Guide”. Image Credit: PhotoFunia.com. Category: Vintage/Typewriter.
Dealing with Non-Paying Clients: A Guide for Service Providers
Whether freelance work or service provision, encountering non-paying clients can be a distressing experience. When a client breaches an agreement without notice or communication, and then reacts with aggression and false accusations when pursued for payment, the situation becomes even more challenging.
Here we can explore strategies to handle such situations, illustrated by the example of a website developer facing a difficult client.
The Scenario: A Web Developer’s Plight
Imagine a web developer, Renata, who signs a contract with a client to create a website. The terms of the agreement include payment milestones aligned with project phases. Despite delivering work on time, the client fails to make the agreed payments. When Renata reaches out to discuss the overdue payment, the client responds with aggression and baseless accusations, creating a hostile environment. To make matters worse, Renata is dealing with personal mental health challenges, exacerbated by the stress of this unpaid work and the client’s behavior.
This situation, unfortunately, is not uncommon. Here’s a structured approach for service providers to navigate such dilemmas effectively.
Steps to Handle Non-Paying Clients
1. Stay Professional and Document Everything
Maintain Professionalism: Regardless of the client’s behavior, remain calm and professional in all communications. Avoid matching their aggression, as this can escalate the situation.
Document Everything: Keep detailed records of all communications, work delivered, and attempts to resolve the issue. This documentation will be crucial if legal action becomes necessary.
2. Review the Contract
Understand Your Rights: Revisit the contract to ensure you fully understand the terms, including payment schedules, deliverables, and breach of contract clauses. This knowledge strengthens your position in negotiations or legal proceedings.
3. Communicate Clearly and Firmly
Send a Formal Notice: Draft a formal letter or email detailing the breach of contract and the outstanding payment. Be clear about the consequences of non-payment, referencing the specific terms of the contract.
Request a Resolution: Offer a specific timeframe for the client to make the payment and suggest possible resolutions to avoid further conflict.
4. Seek Legal Advice
Consult a Lawyer: If the client remains unresponsive or continues to be aggressive, seek legal advice. A lawyer can guide you on potential legal actions, such as filing a claim in small claims court.
Consider Mediation: Before escalating to court, consider mediation as a way to resolve the dispute amicably with a neutral third party.
5. Prioritize Your Well-being
Take Care of Your Mental Health: Dealing with difficult clients can be emotionally draining. Ensure you have support systems in place, such as friends, family, or professional counseling.
Set Boundaries: Do not allow the client’s behavior to intrude on your personal life. Establish clear boundaries to protect your mental and emotional well-being.
What to Avoid
1. Avoid Emotional Reactions
Don’t Respond in Anger: Reacting emotionally can undermine your position. Take time to cool down before responding to any aggressive communication.
2. Don’t Ignore the Issue
Face the Problem Head-On: Ignoring the problem won’t make it go away. Address the issue promptly to avoid further complications.
3. Don’t Abandon Professionalism
Maintain Integrity: Even if the client is rude or hostile, maintain your professionalism. Your reputation as a reliable and professional service provider is at stake.
4. Don’t Engage in Public Disputes
Keep Disputes Private: Avoid airing grievances publicly, such as on social media. This can backfire and damage your professional reputation.
Conclusion
Dealing with non-paying clients is a challenging aspect of running a service-based business. By maintaining professionalism, documenting all interactions, understanding your contractual rights, and seeking legal advice when necessary, you can navigate these situations more effectively. Prioritizing your mental health and setting boundaries is crucial to maintaining your well-being in the face of such stress.
Remember, while it’s important to protect your business interests, preserving your mental and emotional health is paramount. Dealing with difficult clients is never easy, but with the right approach and support, you can manage these challenges and continue to thrive in your professional endeavors.
In the case of the website client, I have suspended both the blog and the static site, opting to put the exact match keyword domain names up for sale:
This decision was made to avoid the lengthy and stressful process of taking the client to court, which would only exacerbate the anxiety and mental health challenges I am already facing. Ironically, the client, who advocates for mental health awareness, used an abusive tone with me, further highlighting their lack of empathy and inconsistency in their values. This approach not only mitigates additional stress but also serves as a practical resolution to the unpaid work, allowing me to focus on more respectful and reliable clients.
Enhancing User Experience: iRenata’s Guide to Adding Cookie Banners and Popups to the Astra Theme on WordPress
Where privacy concerns are at the forefront, website owners must prioritize transparency and user consent regarding data collection practices. Implementing cookie banners and popups is not just a legal requirement but also a crucial aspect of providing a seamless and trustworthy browsing experience for visitors. For WordPress users, integrating these features seamlessly into their websites, particularly with popular themes like Astra, is paramount.
Fortunately adding cookie banners and popups to the Astra theme becomes a straightforward process. iRenata’s comprehensive guide ensures website owners can comply with regulations and effortlessly enhance user experience.
Understanding the Importance of Cookie Banners and Popups
Before delving into the technicalities, it’s crucial to grasp why cookie banners and popups are indispensable components of any website:
Compliance: Regulations such as the (UK) General Data Protection Regulation (GDPR) and the California Consumer Privacy Act (CCPA) mandate that websites must inform users about the use of cookies and obtain their consent. Failure to comply can result in hefty fines and reputational damage.
User Consent: Cookie banners and popups empower users by giving them control over their data. By providing clear information and options to accept or decline cookies, websites foster trust and respect user privacy preferences.
Enhanced User Experience: While cookie banners and popups may seem intrusive when implemented correctly, they can contribute to a positive user experience. By presenting information succinctly and unobtrusively, websites can maintain engagement and minimize disruption.
iRenata’s Guide to Adding Cookie Banners and Popups to the Astra Theme
Now, let’s explore the step-by-step process outlined by iRenata to seamlessly integrate cookie banners and popups into the Astra theme:
Choose a Plugin: iRenata recommends selecting a reliable WordPress plugin for cookie management and consent. Popular choices include CookieYes, GDPR Cookie Consent, and Cookiebot. Each plugin offers various features such as customization options, cookie scanning, and automatic compliance updates.
Install and Activate the Plugin: After selecting a suitable plugin, install and activate it on your WordPress website. Navigate to the plugin settings to configure preferences according to your website’s needs, such as cookie categories, banner design, and consent methods.
Customize Banner Appearance: Tailor the appearance of the cookie banner to align with your website’s aesthetics and branding. Most plugins offer customization options for colours, fonts, messages, and button styles. Ensure that the banner is prominent enough to capture users’ attention without obstructing content.
Configure Cookie Settings: Define which types of cookies your website uses and provide users with clear explanations of their purpose and functionality. Allow users to manage cookie preferences easily, granting them the flexibility to accept or reject specific cookie categories.
Implement Popups for Additional Consent: In addition to the cookie banner, consider implementing popups for obtaining consent for other purposes such as newsletter subscriptions or marketing communications. Customize popup designs and content to maximize engagement while respecting users’ preferences.
Test and Monitor Performance: Before making the changes live, thoroughly test the functionality of the cookie banners and popups across different devices and browsers. Regularly monitor user interactions and update cookie settings as needed to ensure ongoing compliance and optimal user experience.
Website owners can seamlessly integrate cookie banners and popups into the Astra theme, enhancing compliance with regulations and fostering trust with users. Remember, transparency and user consent are paramount in building a sustainable online presence while prioritizing privacy and user experience.
Implementing cookie banners and popups becomes an accessible task, empowering website owners to navigate the complexities of data privacy regulations while delivering exceptional user experiences on WordPress-powered websites.
What if you cannot see the standard interface of WordPress Dashboard on the Astra Theme
If you’re unable to see the standard interface of the WordPress Dashboard while using the Astra Theme, it could be due to a variety of reasons ranging from compatibility issues to conflicts with other plugins or customizations.
Here’s what you can do to troubleshoot and resolve the issue:
Check Compatibility: Ensure that the version of WordPress you’re using is compatible with the version of the Astra Theme installed on your website. Sometimes, outdated themes or plugins can cause interface issues.
Disable Plugins: Temporarily deactivate all plugins except for the Astra Theme to determine if any of them are causing conflicts. If the standard interface reappears after deactivating a specific plugin, that plugin is likely the culprit. You can then troubleshoot further or find an alternative plugin.
Switch to Default Theme: Switch to a default WordPress theme like Twenty Twenty-One to see if the issue persists. If the standard interface appears with the default theme, it indicates that there might be compatibility issues between WordPress, the Astra Theme, and any customizations you’ve made.
Check Customizations: If you’ve made customizations to the theme files or added custom code snippets, revert them to their original state one by one to identify if any of them are causing the problem.
Clear Cache: Clear your browser cache and WordPress cache (if you’re using a caching plugin) to ensure that you’re viewing the most up-to-date version of your website.
Update Software: Make sure that WordPress, the Astra Theme, and all plugins are updated to their latest versions. Developers often release updates to address bugs and improve compatibility.
Seek Support: If you’re still unable to resolve the issue, reach out to the support team of the Astra Theme or WordPress forums for assistance. They may be able to provide further guidance or troubleshoot the issue more effectively.
How to switch to the default WordPress theme
Switching to the default WordPress theme is a straightforward process that you can do from your WordPress Dashboard. Here’s how:
Login to WordPress Dashboard: Enter your website’s URL followed by /wp-admin in your web browser’s address bar. Log in with your username and password to access the WordPress Dashboard.
Navigate to Appearance > Themes: On the left-hand side menu, hover over “Appearance,” and then click on “Themes.”
Find Default Theme: In the Themes screen, you’ll see a list of all installed themes. Look for a theme with a name like “Twenty Twenty-One,” “Twenty Twenty,” or another default theme depending on the version of WordPress you are using. These default themes usually come pre-installed with WordPress.
Activate Default Theme: Hover over the default theme you want to activate, then click the “Activate” button that appears. WordPress will now switch to the default theme.
Preview (Optional): Before activating, you can click on the “Live Preview” button to see how your website looks with the default theme. This allows you to preview the changes without making them live on your site immediately.
Confirm Switch: If you’re satisfied with the preview or want to proceed without previewing, click “Activate” to switch to the default theme.
Check Your Website: Visit your website in a new browser tab or window to see how it looks with the default theme applied.
That’s it! You’ve successfully switched to the default WordPress theme. If you later decide to switch back to your previous theme or another theme, you can follow the same steps and choose the desired theme from the Themes screen.
What if the login is /customname and not the standard /wp-admin?
If the login URL for your WordPress Dashboard is different and is set to /customname instead of the standard /wp-admin, it suggests that there might be a custom configuration or modification in place.
Access the Dashboard: In your web browser’s address bar, enter your website’s URL followed by /customname . For example, if your website is example.com, you would enter example.com/customname.
Login Credentials: You should reach the login page for your WordPress Dashboard, where you’ll need to enter your username and password to proceed. Use the same login credentials you typically use to access the WordPress Dashboard.
Navigate to Appearance > Themes: After logging in, follow the same steps outlined previously: navigate to “Appearance” in the left-hand menu, then click on “Themes.”
Switch to Default Theme: Look for the default WordPress theme, such as “Twenty Twenty-One” or “Twenty Twenty,” and activate it as described earlier.
Confirm Switch: Once activated, you can preview the theme or directly activate it. Follow the same steps to check your website’s appearance with the default theme.
By following these steps, you can switch to the default WordPress theme even if your WordPress login URL is set to /customname instead of the standard /wp-admin. If you encounter any issues during this process, double-check your login credentials and ensure that you have the necessary permissions to access and modify themes within the WordPress Dashboard.
How to change the login back to the standard /wp-admin or /wp-login.php
To change the login URL back to the standard /wp-admin or /wp-login.php, you’ll need to modify your WordPress site’s settings or configurations. Here’s how you can do it:
Method 1: Using a Plugin
Install and Activate a Plugin: There are several plugins available that allow you to customize the login URL, such as “WPS Hide Login” or “Custom Login URL.” Install and activate one of these plugins from the WordPress Plugin Directory.
Access Plugin Settings: Once the plugin is activated, go to its settings page. You can usually find this under the “Settings” menu in your WordPress dashboard.
Reset Login URL: Within the plugin settings, there should be an option to reset the login URL to the default /wp-admin or /wp-login.php. Click on this option to revert the login URL back to the standard one.
Save Changes: After resetting the login URL, remember to save the changes made in the plugin settings.
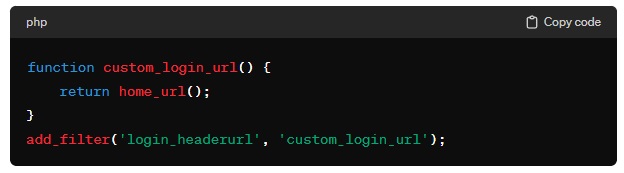
Method 2: Manually Editing Files
If you’re comfortable making changes to your site’s files, you can manually edit the functions.php file in your theme’s directory. Here’s how:
Access Theme Files: Connect to your website’s server using FTP or a file manager provided by your web hosting provider. Navigate to the wp-content/themes directory and locate your currently active theme.
Edit functions.php: Download the functions.php file from your theme directory to your computer. Open it using a text editor.
Add Code: Add the following code snippet to the end of the functions.php file: function custom_login_url() { return home_url(); } add_filter('login_headerurl', 'custom_login_url');This code will redirect the login URL to the homepage of your website.
Save and Upload: Save the changes to the functions.php file and upload it back to your server, overwriting the existing file.
This is an example of the code as cited above.
After completing either of these methods, your WordPress login URL should revert to the standard /wp-admin or /wp-login.php. You’ll then be able to access the login page using the default URL. Remember to test the login functionality to ensure everything is working as expected after making these changes.
Putting your site into maintenance mode is a common practice when you need to perform updates, make significant changes, or troubleshoot issues without disrupting the user experience. Here’s how you can put your WordPress site into maintenance mode:
Method 1: Using a Maintenance Mode Plugin
Install a Maintenance Mode Plugin: Go to your WordPress Dashboard and navigate to Plugins > Add New. Search for a maintenance mode plugin such as “WP Maintenance Mode” or “Coming Soon Page & Maintenance Mode by SeedProd.” Install and activate the plugin.
Configure the Plugin: Once activated, go to Settings > WP Maintenance Mode (or the corresponding plugin you installed). Configure the plugin settings according to your preferences. You can customize the message displayed to visitors, add a countdown timer, and choose whether to allow certain user roles to bypass maintenance mode.
Activate Maintenance Mode: After configuring the settings, toggle the maintenance mode switch to “On” or “Active.” Your site will now display the maintenance mode page to visitors while you work on it in the background.
Deactivate Maintenance Mode: Once you’ve completed your updates or changes, return to the plugin settings and turn off maintenance mode. Your site will then be accessible to visitors again.
Method 2: Using a Maintenance Page in Your Theme
If you prefer not to use a plugin, you can create a maintenance page directly in your theme’s directory:
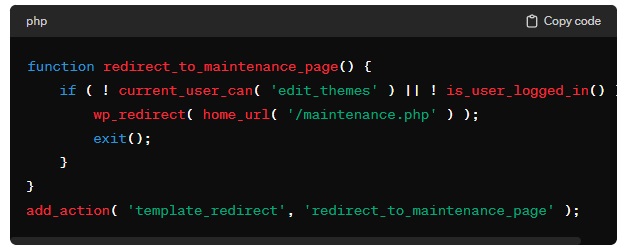
Create a Maintenance Page: Create a new HTML file or PHP file named maintenance.php in your theme’s directory. You can use a basic HTML template or copy the contents of your theme’s 404.php file as a starting point.
Design the Maintenance Page: Customize the maintenance page to include a message informing visitors that your site is undergoing maintenance. You can also add a countdown timer or any other relevant information.
Redirect Visitors: To automatically redirect visitors to the maintenance page, add the following code to your theme’s function redirect_to_maintenance_page() { if ( ! current_user_can( 'edit_themes' ) || ! is_user_logged_in() ) { wp_redirect( home_url( '/maintenance.php' ) ); exit(); } } add_action( 'template_redirect', 'redirect_to_maintenance_page' );
Disable Maintenance Mode: Once you’ve completed your tasks, remove or comment out the code added to the functions.php file to disable maintenance mode and redirect visitors back to the regular site.
Example of the PHP code (Redirect Visitors) which has been added in text format for you to copy and paste.
Remember to test your maintenance mode setup to ensure that it functions as expected before making changes to your live site. This way, you can avoid any unexpected issues or disruptions for your visitors.
How To Access Elementor in Astra Theme
Accessing Elementor within the Astra theme is a seamless process, as both are popular tools for WordPress website development and customization. Elementor is a powerful drag-and-drop page builder plugin that allows users to create and customize their website’s layout without any coding knowledge. Here’s how you can access Elementor within the Astra theme:
Install and Activate Elementor: If you haven’t already installed the Elementor plugin, you can do so by navigating to Plugins > Add New in your WordPress Dashboard. Search for “Elementor,” then click “Install Now” and “Activate” once it’s installed.
Create or Edit a Page: To access Elementor, you’ll need to create a new page or edit an existing one. Go to Pages > Add New to create a new page, or Pages > All Pages to edit an existing one.
Launch Elementor: Once on the page editor screen, you’ll see a button labeled “Edit with Elementor.” Click on this button to launch the Elementor editor for that specific page.
Start Building: After launching Elementor, you’ll have a user-friendly interface divided into sections. On the left side, you’ll find the Elementor panel with widgets, templates, and settings. In the middle, you’ll see the canvas where you can drag and drop elements to build your page. On the right side, you’ll find the settings panel for customizing individual elements and sections.
Customize Your Page: Use the drag-and-drop functionality to add elements such as text, images, buttons, videos, and more to your page. You can customize the layout, style, and content of each element using the settings panel.
Preview and Publish: Once you’ve finished customizing your page, you can preview how it looks on different devices using the preview button. When you’re satisfied with the result, click the “Publish” button to make your changes live on your website.
Access Elementor Settings: To access Elementor’s global settings and preferences, you can go to Elementor > Settings in your WordPress Dashboard. Here, you can configure various options such as default fonts, colors, and breakpoints.
By following these steps, you can easily access Elementor within the Astra theme and leverage its powerful features to create stunning and responsive web pages for your WordPress website. Whether you’re building a simple landing page or a complex website layout, Elementor combined with the Astra theme provides you with the flexibility and versatility to bring your design ideas to life.
SEO Recommended Things Todo
LIST OF SEO THINGS TO DO & HOW TO SET UP WORDPRESS!
Create a Keyword Domain Name (use searchable words and phrases)
Set up hosting.
Select a Theme for your WordPress site – Go to Appearance – Customise in your Dashboard on the left-hand side. (I use ‘Hemmingway Theme for most of my sites).
Generate Sitemap
Upload Sitemaps to your Website/WordPress and Google Search Console
Generate Robot txt.
Upload Robot txt to your Website/WordPress back office and Google Search Console
Generate Href Tags
Upload Href Tags to your Website/WordPress back office
Create a Gmail email that matches your business brand name that you will use to manage your business on Google, use that same email for all Google Products and Services, Analytics, Google Search Console, and Google Ads. (You do not want to give your private email to web developers or the World Wide Web).
Generate Meta Tags
Generate Google Tag Manager
Upload Google Tag Manager to your website’s back office
Upload Meta Tags to your website back office (Add relevant keywords)
Add an HTML Tag to your website’s back office.
Add Google Analytics (to track your visitors)
Upload to Search Engines
Verify your website with Google Webmaster (Google Search Console)
Verify your website with Bing Webmaster
Add a cookie banner (required by law)
Add a cookie policy (required by law) (outlining your tracking)
Add terms and conditions (required by law)
Add a privacy policy (required by law)
Design a Logo & Favicon
Add favicons to desktop, tablet, and mobile phone in your Website/WordPress back office
Add your website to Google My Business (Google will rank you better for doing this)
Check Canonization
Create a Facebook Page to Match your website and connect the two together
Invite your Friends and Family on Facebook to like your page.
Create a LinkedIn Page to March your website and connect the two together
Link your social media to your social media widgets e.g., Facebook, Twitter, Instagram (Do not use a personal social media account set up a business one instead.
Add Schema Mark-up to your website back office and upload it.
Ping your site so that search engines get a signal your website is active, using pingmyurl.com
Regularly add new content to your site so that Search Engines can rank you quickly with SEO.
Create an SEO link Wheel and have more than one site blog pointing to your business
Check your website is looking good on mobile and tablet before publishing.
Make sure your website has a lot of text content using relevant keywords you would want to be targeted for.
Change the Home Page Name to the name of your domain keywords (Search engines do not like (Home or Home Page) as there are millions of websites with the same name so they do look at you favourably for using those words.
Create a Professional Email for your users and your website:
Create Email Signatures
Favourite WordPress Plugins I Recommend
Akismet Anti Spam
All- in-one-seo
Cookie Notice GDPR Consent (Web Toffee)
Debug Bar
Document Embedder
Emojis cs WP
Google Analytics (Set up Google Analytics first) MonsterInsights
GTranslate (if you want your site multilingual)
PDF Embedder (If you ever want to add PDFs to your posts)
Sassy Social Share (Go to settings to set what you want your posts and pages to do).
Subscribe to Double-Opt-In Comments
Tawk.to (For online chat widget)
Super RSS Reader (if you want to get your site to read Sports News Sites).
Visual Footer Credit Remover (Removes the name of the WordPress Theme and lets you customize the footer).
WP Forms (so that people can fill in a form and make comments).
Restore Classic Widgets (this is recommended).
WordFence (stops hackers from gaining control of your site).
Conclusion
Managing various aspects of a WordPress website, such as adding cookie banners, accessing Elementor, or changing the login URL, can seem daunting at first. However, with the right guidance and resources, these tasks become manageable for website owners and developers alike. By following the step-by-step instructions provided in this guide, users can confidently navigate through the complexities of WordPress customization within the Astra theme. Whether it’s ensuring compliance with data privacy regulations, creating visually stunning pages with Elementor, or adjusting site settings, there are solutions available.
If in doubt or encountering challenges during the process, remember that there are numerous resources available online. Forums, documentation, tutorials, and support communities can provide valuable insights and troubleshooting tips. Additionally, reaching out to experienced professionals like iRenata, known for expertise in WordPress customization, can offer personalized assistance and guidance tailored to specific needs. Ultimately, with determination, patience, and access to the wealth of resources available, anyone can effectively manage and customize their WordPress website to meet their unique requirements and achieve their desired online pres
Understanding Terms & Conditions, Disclaimers, and Privacy Policies
Where information flows freely and transactions occur at the speed of light, establishing trust and transparency is crucial. For both businesses and users, understanding and adhering to legal frameworks such as Terms & Conditions, Disclaimers, and Privacy Policies is paramount. These documents serve as the foundation for ethical and lawful digital interactions, offering a roadmap for responsible online conduct.
Terms & Conditions:
Terms & Conditions, often referred to as T&C or Terms of Service, represent a legally binding agreement between a service provider (often a website or app) and its users. This document outlines the rules and guidelines that users must follow to access and use the offered services. Key components typically include:
Acceptance of Terms: Users are required to agree to the stated terms before using the platform. This establishes a contractual relationship between the user and the service provider.
User Conduct: Guidelines on acceptable behavior, prohibited activities, and consequences for violating the terms are outlined. This helps maintain a safe and respectful online environment.
Intellectual Property: Information about the ownership of content, trademarks, and copyrights, protecting both the user and the service provider from potential legal disputes.
Termination Clause: Conditions under which either party can terminate the agreement, safeguarding the interests of both users and providers.
Limitation of Liability: Defines the extent to which the service provider is responsible for any damages or losses incurred by users, establishing the legal boundaries of accountability.
Disclaimers:
Disclaimers are statements intended to limit the legal liability of a business or individual for the accuracy, completeness, or consequences of their provided information or services. While not exhaustive, disclaimers are designed to:
Mitigate Risks: Inform users about potential risks associated with the use of services or reliance on information, ensuring they make informed decisions.
Clarify Intent: Communicate the purpose of the content or services and any limitations, avoiding misunderstandings that could lead to legal challenges.
Protect Against Misuse: Discourage misuse of information or services for purposes not intended by the provider.
Common types of disclaimers include those related to:
Accuracy of Information
Financial Advice
Health Information
External Links
Third-party Endorsements
Privacy Policies:
Privacy Policies are crucial in an era where personal data is a valuable commodity. These documents outline how an organization collects, uses, shares, and protects user information. Key elements of privacy policies include:
Information Collected: Specify the types of data collected, such as personal details, cookies, or device information.
Purpose of Data Use: Explaining why and how collected data will be utilized, whether for service improvement, analytics, or marketing purposes.
Data Sharing: Detailing circumstances under which user data might be shared with third parties and ensuring transparency in such transactions.
Security Measures: Assuring users of the measures in place to protect their data from unauthorized access or breaches.
User Rights: Informing users of their rights regarding data access, correction, or deletion, as well as providing avenues for addressing concerns.
In a world driven by digital interactions, these legal documents play a vital role in creating a secure and trustworthy online environment. Both businesses and users should prioritize understanding these terms, as they form the basis of ethical and lawful engagement in the ever-evolving digital landscape. By fostering transparency, respecting user privacy, and clarifying responsibilities, these agreements contribute to a more accountable and responsible Internet ecosystem.
Crafting Robust Terms and Conditions for Loan Companies and Financial Institutions
In the intricate world of finance, where transactions involve substantial sums of money and complex agreements, having comprehensive and well-defined Terms and Conditions (T&C) is essential for both loan companies and financial institutions. These legal documents serve as the bedrock of the relationship between the lender and the borrower, providing clarity, transparency, and legal protection. Here’s an exploration of why these entities need T&C and the key elements that should be articulated within them.
1. Legal Protection and Compliance:
Loan companies and financial institutions operate within a heavily regulated environment. Crafting explicit terms helps these entities establish a legal framework that adheres to local and international laws. This includes compliance with financial regulations, anti-money laundering laws, and consumer protection statutes. A well-structured T&C ensures that the lending institution is shielded from potential legal disputes and regulatory penalties.
2. Clear Borrower Obligations:
Terms and Conditions should lay out the borrower’s obligations in an unambiguous manner. This includes details such as the loan amount, interest rates, repayment schedule, and any associated fees. Clarity in outlining these aspects helps manage borrower expectations and fosters a transparent lending process.
3. Interest Rates and Fees:
Transparent disclosure of interest rates and fees is crucial for both the lender and the borrower. The T&C should explicitly state how interest is calculated when it accrues, and any additional charges or penalties for late payments or early repayment. This transparency is fundamental in maintaining trust between the financial institution and its clients.
4. Loan Repayment Terms:
The T&C should detail the agreed-upon loan repayment schedule, including the frequency of payments, the method of payment, and any grace periods provided. This ensures that borrowers are well-informed about their financial commitments and helps mitigate the risk of default.
5. Collateral and Security Agreements:
In cases where loans are secured by collateral, the T&C should outline the specifics of the collateral, the process for valuation, and the conditions under which the lender can seize the collateral in the event of default. This helps safeguard the financial institution’s interests and provides a transparent understanding of the borrower’s responsibilities.
6. Default and Remedies:
The T&C should clearly define what constitutes a default and the remedies available to the lender in such instances. This could include penalties, additional fees, or legal actions. Clarity on these aspects helps manage risks and sets expectations for both parties involved.
7. Confidentiality and Data Protection:
Given the sensitive nature of financial transactions, T&C should include provisions regarding the confidentiality and protection of customer information. This is especially pertinent in an era of increased cybersecurity threats. Outlining how the institution will handle and protect client data instills confidence in borrowers.
8. Amendment and Termination Clauses:
The T&C should specify under what conditions the agreement can be amended and the circumstances under which it can be terminated by either party. Clearly defined procedures for making changes to the agreement help prevent misunderstandings and disputes down the line.
9. Governing Law and Dispute Resolution:
Including a clause that designates the governing law and outlines the dispute resolution mechanism is crucial. This provides a clear roadmap for resolving conflicts and avoids legal complexities associated with disputes in different jurisdictions.
Conclusion:
Where trust and accountability are paramount, well-crafted Terms and Conditions are indispensable. For loan companies and financial institutions, these documents not only provide legal protection but also contribute to a transparent and responsible lending environment. By clearly outlining rights, responsibilities, and procedures, T&C fosters positive relationships between lenders and borrowers, ultimately contributing to the integrity and stability of the financial system.